How to Build a Retaining Wall with Concrete Blocks
You’ve probably seen them around your neighborhood: leaning, bulging retaining walls that are clearly failing. A wall that fails isn’t just an eyesore; it’s a safety hazard and a sign that crucial steps were missed during construction. The difference between a wall that lasts for decades and one that fails after a few years comes down to technique. This guide focuses on getting it right the first time. We will teach you how to build a retaining wall with concrete blocks by focusing on the most critical elements: a perfectly level foundation, a robust drainage system to handle Florida’s downpours, and proper backfilling techniques. By avoiding common mistakes, you can ensure your hard work results in a secure, long-lasting structure.
Key Takeaways
- Success Starts Below Ground: The most critical steps happen before you lay the first block. A perfectly level, compacted gravel base and a comprehensive drainage system—including a perforated pipe and gravel backfill—are essential for preventing a leaning or failed wall.
- Build for Strength, Not Just for Looks: Use solid, interlocking retaining wall blocks specifically designed for the job. Staggering each course and adding geogrid reinforcement for walls over three or four feet tall are crucial techniques that provide long-term stability.
- Prioritize Safety and Follow Local Rules: Always check local building codes for height restrictions and permit requirements before you start digging. For any wall over four feet tall or on a tricky slope, hiring a professional is the safest and most reliable choice.
What Do You Need to Build a Concrete Block Retaining Wall?
Before you can start building, you need to gather the right supplies. A successful retaining wall project is all about preparation, and having the correct materials and tools on hand from the beginning will save you a lot of headaches later. Think of it like following a recipe—you wouldn’t start baking without first making sure you have all the ingredients. Let’s walk through exactly what you’ll need to get the job done right.
Choose Your Concrete Blocks
First things first, let’s talk about the star of the show: the concrete blocks. It’s incredibly important that you don’t use standard, hollow cinder blocks for this project. They simply aren’t designed to hold back the immense pressure of soil and water and are likely to fail. Instead, you need to get special retaining wall blocks. These are solid and designed with a small lip on the bottom edge. This lip is a game-changer, as it helps each row interlock with the one below it, creating a strong, stable wall that can stand the test of time. Choosing the right block is the first step toward a wall that lasts.
Gather Your Materials and Supplies
Once you’ve picked out your blocks, it’s time to round up the rest of your materials. You’ll need the main retaining wall blocks and some topper blocks, also called capstones, for a clean, finished look on the top row. For the foundation and drainage, you’ll need plenty of sharp, angular gravel—not smooth river rock. Also, grab a perforated drainage pipe with a fabric sleeve to prevent clogs. To secure the capstones, you’ll want some concrete adhesive and a caulking gun. Having all these materials ready before you start digging will make the entire process much smoother. For larger projects, our hardscaping services can handle sourcing and delivering all the necessary materials for you.
Get the Right Tools
Having the right tools makes any job easier, and building a retaining wall is no exception. You’ll need some basic equipment like a sturdy shovel for digging the trench, work gloves to protect your hands, and a wheelbarrow for moving blocks and gravel. For precision, you’ll want wooden stakes, string, and a line level to keep your layout straight. A long carpenter’s level is essential for checking that each row is perfectly even from side to side and front to back. Finally, don’t forget a soil tamper. This tool is critical for compacting the soil and gravel base, which creates the solid foundation your wall depends on.
Calculate How Much You Need
To avoid running out of materials mid-project, you’ll need to do a little math upfront. Start by measuring the total length and desired height of your wall. Remember that the first row of blocks will be partially buried for stability, so factor that into your height calculation. A good rule of thumb is to dig a trench about 8 inches deep and add a 4-inch layer of compacted gravel. This means your first block will sit about 4 inches below ground level. Once you have your total square footage, your local supplier can help you figure out the exact number of blocks you need. If you’re unsure, the team at DEANGELO’S LAND SERVICES can provide an expert consultation as your local retaining wall contractor.
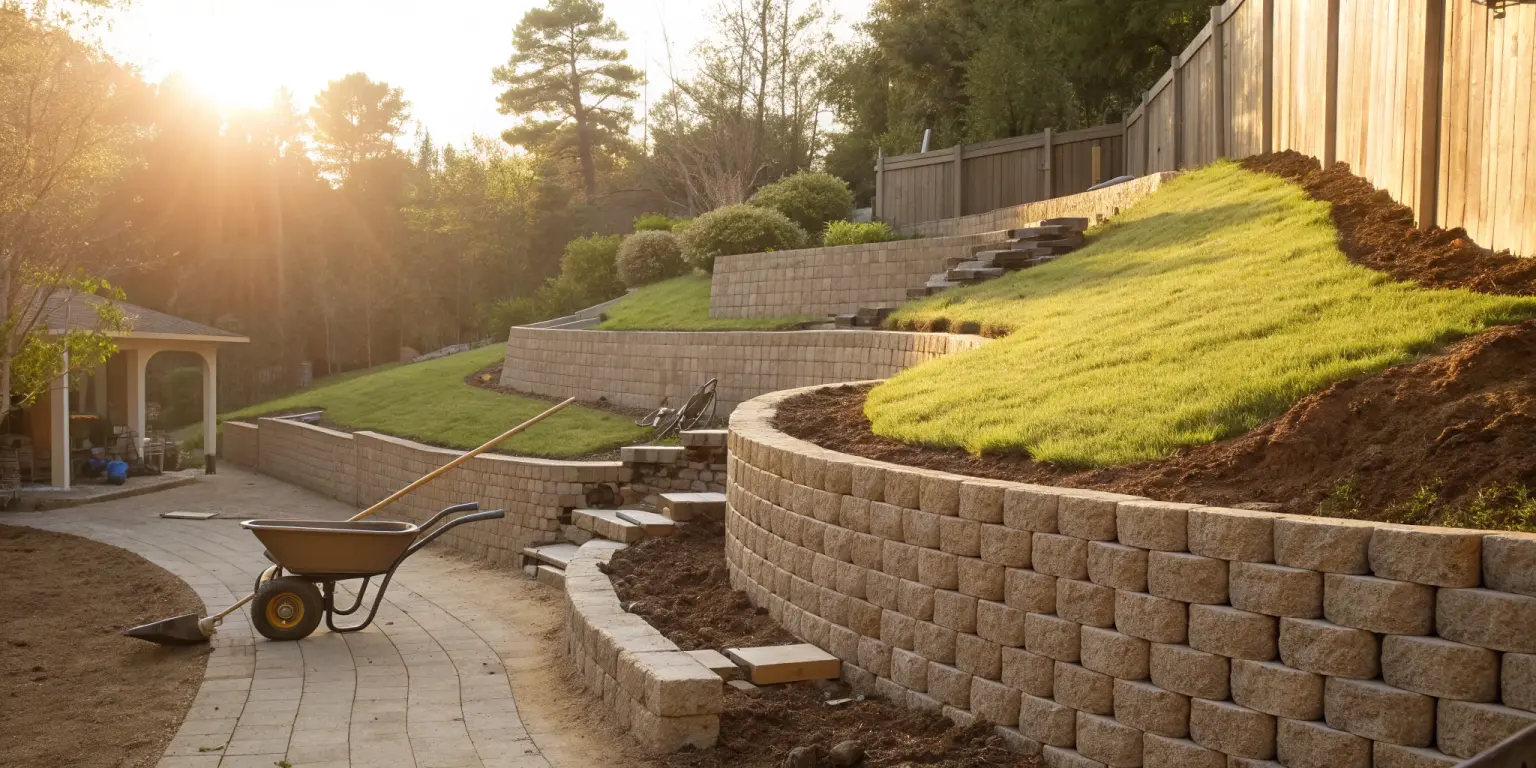
How to Prepare the Site for Your Retaining Wall
A strong retaining wall starts from the ground up—literally. Before you even think about laying the first block, you need to get the site ready. This prep work is the most important part of the entire project because it creates the stable foundation your wall needs to stand strong for years. Rushing this stage can lead to a leaning, bulging, or failing wall down the road. Taking the time to do it right ensures your hard work pays off with a structure that’s both beautiful and functional.
Check Local Codes and Call 811
First things first: do your homework. Before you break ground, check with your local municipality in Lake Mary or Central Florida about building codes and permit requirements. Many areas have rules about how tall a retaining wall can be without an engineer’s approval, typically around three or four feet. Going over this height often requires a professional plan to ensure it’s safe. Even more critical is making a free call to 811. This service marks the location of underground utility lines on your property, so you can dig safely without hitting a water pipe or electrical line. It’s a simple step that prevents dangerous and expensive accidents.
Mark and Dig Your Trench
With the legal and safety checks out of the way, it’s time to map out your wall. Use wooden stakes and a string line to create a clear guide for where the wall will go. This simple visual will help you keep everything straight as you work. Once you’re happy with the layout, you can start digging the trench. Aim for a trench that’s about eight inches deep and a few inches wider than your concrete blocks. This gives you enough room for the base material. After digging, use a hand tamper to compact the soil at the bottom. A firm, solid base is essential for the next step. If the thought of digging makes your back ache, professional excavation services can handle the heavy lifting for you.
Create a Level Gravel Base
Now you’ll build the foundation that will support the entire wall. Fill the trench with a four-inch layer of compactible gravel, like 1/4-inch crushed stone. This gravel base is crucial for two reasons: it provides a stable platform for the blocks and allows water to drain away from the wall’s base, preventing pressure buildup. Spread the gravel evenly, then use a long level to check that it’s perfectly flat from front to back and side to side. A level base ensures your first row of blocks goes in straight, which sets the tone for the entire wall. Getting this part exactly right is where professional retaining wall installation truly shines, as even a slight error here can cause problems later.
How to Lay the Concrete Blocks, Step by Step
With your foundation perfectly prepped, it’s time for the most satisfying part: building the wall. This is where your project starts to take shape, block by block. Precision is your best friend here. Taking your time on these steps ensures your wall will be strong, straight, and built to last. Let’s get those blocks laid.
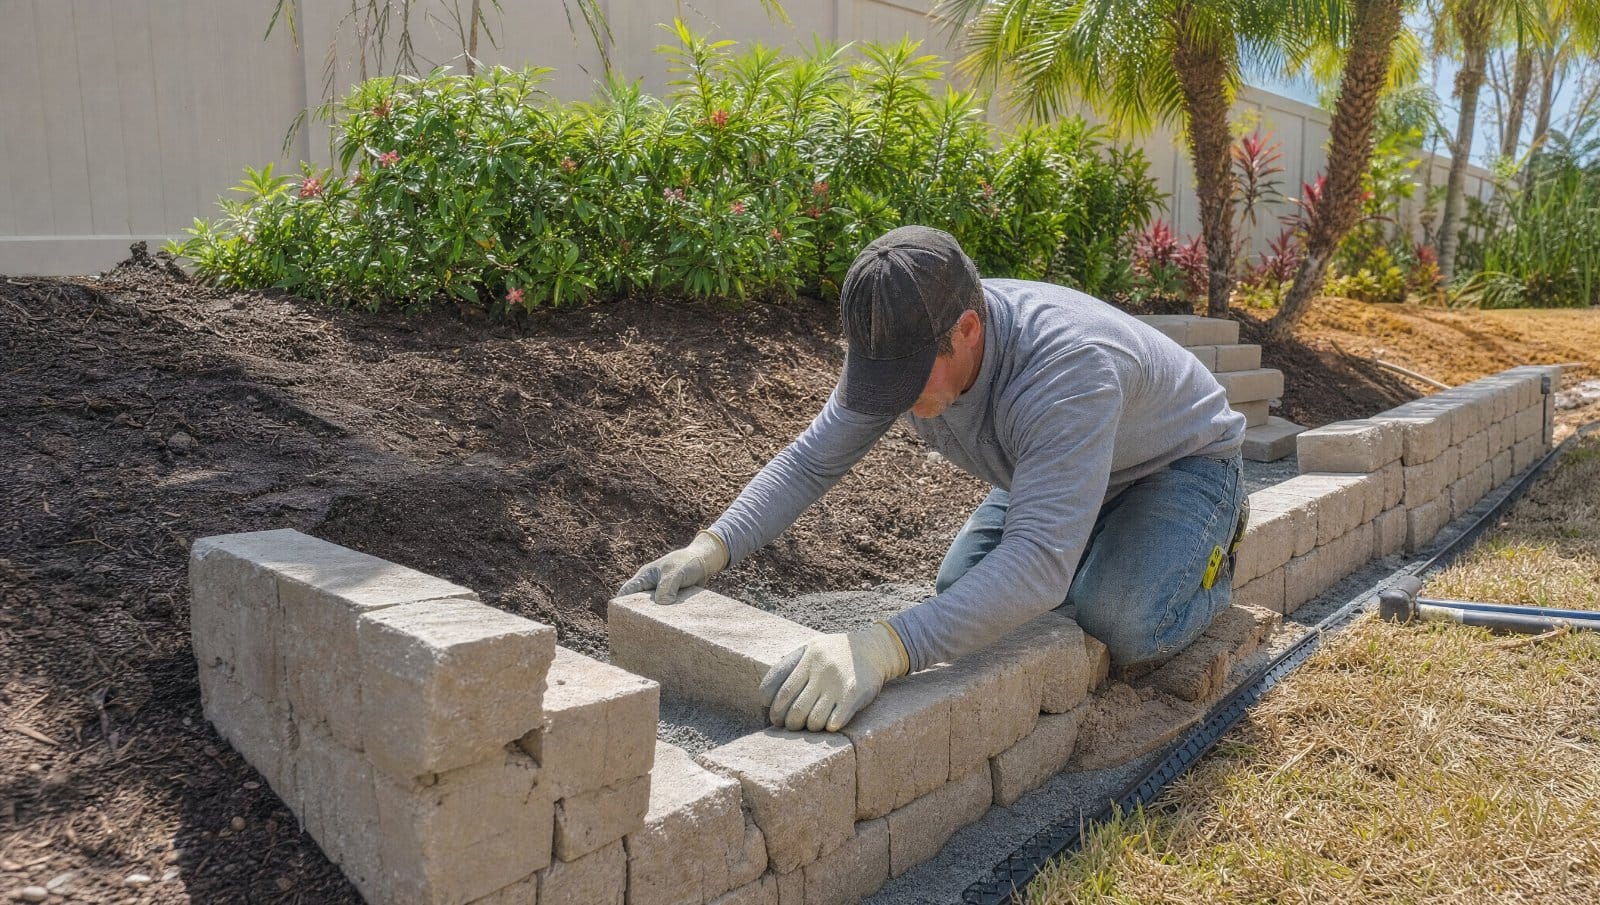
Set Your Foundation Row
This first row is the most important one you will lay, so don’t rush it. Every other block will rest on this foundation, so it needs to be perfectly level. Place your first concrete blocks on the prepared gravel base, making sure at least half of the block’s height is buried below ground level. This anchors the entire wall. Use a rubber mallet to gently tap the blocks into place, checking for level both front-to-back and side-to-side with a carpenter’s level. Check again after every single block. If you get this row right, the rest of the project will go much more smoothly. For a project of this scale, having a solid plan for your retaining wall installation is key to success.
Stack and Stagger the Next Rows
Once your foundation row is solid and level, you can start building up. Begin the second row with a half-block to create a staggered pattern, similar to a brick wall. This running bond pattern is crucial because it adds significant strength and stability by ensuring the joints don’t line up vertically. Most modern retaining wall blocks have a lip on the back or a pin system that helps lock them together and create a consistent setback. As you place each block, sweep any debris off the one below it for a tight fit. Continue to check that each block and each completed row is level before moving on to the next.
Keep Your Wall Straight and Set Back
As your wall gets taller, you need to make sure it stays straight and maintains the proper backward lean, or “setback.” Use a string line tied between stakes at either end of the wall as a guide for keeping the face of the wall perfectly aligned. The interlocking system on your blocks should create a natural setback, but it’s wise to check it with your level. Also, check that each block is level from front to back. If your blocks have hollow cores, fill them with 3/4-inch angular gravel. This adds weight, improves drainage, and locks the blocks firmly in place, creating a more solid structure.
Reinforce Taller Walls with Geogrid
If your wall is going to be taller than three or four feet, you’ll need to add reinforcement. Geogrid is a strong, flexible mesh that connects the wall to the soil behind it, creating a solid, unified mass that can withstand immense pressure. You’ll lay the geogrid fabric over a row of blocks, extending it several feet back into the hillside. Then, you’ll place the next row of blocks on top to secure it before backfilling with gravel. For taller or more complex walls, it’s always best to consult with professionals. Projects that require significant structural support are best handled by experienced hardscaping services to ensure they are safe and properly engineered.
How to Add Proper Drainage Behind Your Wall
A retaining wall is only as strong as its ability to manage water. Without a proper drainage plan, water from rain and irrigation gets trapped in the soil behind your wall. This saturated soil becomes incredibly heavy, creating what’s known as hydrostatic pressure. This constant force is the number one reason retaining walls bulge, crack, and eventually fail. Here in Florida, where we get sudden, heavy downpours, managing that water is absolutely critical to prevent a costly structural failure down the road.
Think of your drainage system as the wall’s essential support network. It’s not an optional add-on; it’s a core part of the structure that ensures your wall will stand strong for years to come. A well-designed system gives water an easy escape route, relieving the pressure and protecting your investment. Getting this part right involves a three-pronged approach: installing a perforated pipe, using gravel for backfill, and creating weep holes. Each element works together to keep the area behind your wall from becoming a waterlogged mess. If you’re feeling unsure about this step, it’s often best to consult with a professional retaining wall contractor to ensure it’s done correctly from the start.
Install a Perforated Drainage Pipe
The workhorse of your drainage system is a perforated drainpipe. This is a plastic pipe with small holes or slits that collect water and channel it away. You’ll lay this pipe in the gravel at the base of the wall, right behind your first course of blocks. To keep dirt and debris from clogging the holes, the pipe should be covered with a fabric “sock.”
Most importantly, the pipe needs to be sloped slightly from one end to the other. This gentle grade uses gravity to direct water out and away from the wall’s foundation, releasing it in a safe location. This simple component is a key part of any effective landscape drainage solution and is absolutely essential for a retaining wall.
Backfill with Gravel, Not Soil
Once your pipe is in place, it’s time to backfill. It might seem easiest to just shovel the original soil back behind the wall, but this is a huge mistake. Soil, especially clay-heavy soil, holds onto water like a sponge. Instead, you need to backfill with gravel.
Gravel creates a porous layer that allows water to drain freely down to the perforated pipe at the base. This prevents water from sitting against the blocks, which reduces hydrostatic pressure and stops mud from seeping through the joints of your wall. You should add the gravel in layers, compacting each one as you build the wall higher. This ensures there are no voids and that you have a solid, free-draining mass behind your wall.
Create Weep Holes for Water to Escape
Weep holes are a final layer of insurance for your drainage system. These are small openings in the face of the wall that allow any trapped water to escape before it can build up pressure. Think of them as little safety valves. Even with a great pipe and gravel backfill, weep holes provide an immediate exit for water that might accumulate near the bottom of the wall.
You can create weep holes by leaving a small, mortar-free vertical gap between a few blocks on the first or second course. Spacing them every four to six feet is a good rule of thumb. This simple step provides an extra measure of protection, ensuring that water always has a way out and can’t become a destructive force against your hard work.
How to Finish Your Retaining Wall Project
You’ve done the heavy lifting—the trench is dug, the base is level, and the blocks are stacked. Now it’s time for the finishing touches that turn a stack of blocks into a durable, professional-looking retaining wall. These final steps are all about securing the structure, managing water, and ensuring your hard work lasts for years. Skipping these details can lead to a wall that leans or fails, so it’s worth getting them right.
Secure the Cap Blocks
The cap blocks, or capstones, are the flat blocks that sit on the top row. They provide a clean, finished look and protect the wall’s core from rain. To install them, run a thick bead of construction adhesive along the top of your last row of blocks. Firmly press each cap block into place, making sure it’s level and aligned with the others. You can use a rubber mallet to gently tap them into position if needed. It’s important to let the adhesive cure completely according to the manufacturer’s instructions before moving on. This ensures the top of your wall is solid and secure.
Finish Backfilling and Compact the Soil
With the capstones secure, you can complete the backfilling process. Start by adding more drainage gravel to completely cover the perforated pipe. Next, add your backfill soil on top of the gravel in four- to six-inch layers. Use a hand tamper to compact each layer thoroughly before adding the next. This step is critical for preventing the soil from settling over time, which could create a sinkhole behind your wall and reduce its stability. A solid, well-compacted backfill is key to a long-lasting retaining wall installation that can withstand pressure for years to come.
Grade the Area to Prevent Erosion
The final step is to grade the soil behind and around your new wall. The goal is to create a gentle slope that directs surface water away from the structure. Water is the biggest enemy of a retaining wall, and allowing it to pool behind the wall creates immense pressure that can cause it to fail. Proper grading is one of the most important landscape drainage solutions you can implement to protect your investment. Use a rake to shape the topsoil, ensuring there are no low spots where water can collect. This simple action protects the wall’s foundation and prevents erosion from washing away your hard work.
Common Retaining Wall Mistakes to Avoid
Building a retaining wall is a rewarding project, but a few common missteps can turn your hard work into a leaning, bulging mess. Even small errors in the early stages can lead to major structural problems later on. The good news is that these mistakes are entirely preventable with a bit of planning and attention to detail. By understanding where things can go wrong, you can ensure your wall stands strong for years. From a weak foundation to poor water management, the most frequent problems are often the easiest to avoid. Taking the time to get the fundamentals right will save you from costly repairs and the headache of a failing wall. It’s about building it right the first time so you don’t have to build it again. If you’re planning a large or complex wall, or if your property has significant slopes, working with a professional retaining wall contractor is the best way to sidestep these issues altogether. Let’s walk through the three biggest mistakes so you know exactly what to watch out for.
A Poorly Prepared Foundation
Think of your retaining wall’s base like the foundation of your house—if it isn’t solid, level, and deep enough, the entire structure is at risk. A poorly prepared foundation is the number one cause of a failing wall. Rushing this step or cutting corners by not digging deep enough or using the wrong base material will almost certainly lead to shifting, settling, or leaning. The ground beneath the wall needs to be compacted firmly, and the gravel base must be perfectly level. Taking the extra time to get this part right is the most important investment you can make in your wall’s longevity and stability.
Forgetting About Drainage
Water is incredibly heavy, and when it gets trapped in the soil behind your wall, it creates immense pressure. This force, known as hydrostatic pressure, is a retaining wall’s worst enemy and a primary reason they fail. Proper drainage solutions are not optional; they are essential. This means installing a perforated pipe at the base, backfilling with gravel instead of dense soil to allow water to flow freely, and including weep holes. Without a clear path to escape, water will build up and push relentlessly against your blocks, causing them to bow, crack, or even collapse over time. Don’t let trapped water undo all your hard work.
Ignoring Permits and Height Limits
Before you even break ground, it’s crucial to check with your local building department in Lake Mary or your specific Central Florida municipality. Many areas have strict rules about retaining walls, especially concerning height. A common rule of thumb is that any wall over four feet tall requires a building permit and may even need plans signed off by a licensed engineer. Building a tall wall without the proper permits or structural reinforcement isn’t just a code violation; it’s a serious safety hazard. Always make the call to your local officials to understand the specific requirements for your project to keep it safe and legal.
How Much Does a Concrete Block Retaining Wall Cost?
Figuring out the budget for a retaining wall is one of the first, and most important, steps. The final cost depends on a few key things: the size of your wall, the specific type of concrete blocks you choose, and the biggest variable of all—whether you plan to build it yourself or hire a professional. A small, simple wall will have a very different price tag than a tall, engineered one that needs to hold back a significant amount of soil.
Understanding these factors will help you create a realistic budget and decide on the best approach for your property. We’ll break down the costs for materials and compare what you might spend on a DIY project versus bringing in an experienced crew. This way, you can plan your project with confidence and know what to expect before you even break ground.
Budgeting for Your Materials
When you’re pricing out your project, the concrete blocks themselves will be your biggest material expense. On average, you can expect concrete retaining wall materials to cost between $20 and $40 per square foot, depending on the style and quality of the block. Standard cinder blocks, or CMUs, often fall in the $20 to $35 per square foot range. But don’t forget to account for the other necessary supplies. You’ll also need to budget for gravel to create a stable base and for backfill, a perforated drainage pipe, landscape fabric, and the cap blocks to give your wall a finished look. These items add up, so be sure to include them in your calculations for an accurate total.
DIY vs. Hiring a Pro: A Cost Comparison
Deciding between a DIY build and hiring a professional crew often comes down to balancing your budget with your time and skill level. Tackling the project yourself means you can save significantly on labor costs, which is a huge plus. However, you’ll need to factor in the cost of renting or buying tools, your time, and the physical effort involved. Plus, mistakes with the foundation or drainage can lead to a failing wall and more expensive repairs down the road.
Hiring a professional retaining wall contractor provides peace of mind that the job is done right. For a smaller wall under three feet, professional installation might range from $1,000 to $5,000. While it’s a bigger upfront investment, you’re paying for expertise, efficiency, and a durable wall that will last for years.
Know When to Call a Professional
While tackling a DIY project can be incredibly rewarding, it’s also important to know when a job is better left to the experts. Building a retaining wall isn’t just about stacking blocks; it’s about creating a safe, stable structure that will stand the test of time. Forgetting a crucial step or misjudging your property’s needs can lead to a leaning, bulging, or completely failed wall down the road—a costly and dangerous mistake. Certain situations involve complexities that require professional engineering and construction experience. If your project involves intricate designs, significant height, or challenging landscape features, calling in a pro is the smartest move you can make.
For Complex or Engineered Walls
If your vision extends beyond a simple, straight garden wall, you’re likely entering the territory of complex or engineered walls. These structures often require specific calculations and designs to ensure they can handle the immense pressure from the soil and water behind them. A professional team has the expertise to create a wall with proper reinforcement and drainage systems built right into the design. Investing in a professional retaining wall installation is the best way to guarantee your wall is not only beautiful but also structurally sound for years to come, preventing future headaches and costly repairs.
When Your Wall is Tall or Your Yard is Tricky
Height is a major factor in retaining wall stability. As a wall gets taller, the pressure behind it increases exponentially. Most local building codes set a limit—often around four feet—for walls built without an engineering permit. Anything taller poses a significant risk if not constructed perfectly. Similarly, if your yard has steep slopes, poor soil quality, or existing drainage problems, a standard DIY approach might not be enough. Professionals can properly assess these site conditions and implement effective drainage solutions to prevent water pressure from building up and causing the wall to fail. They have the right equipment and knowledge to handle these challenges safely.
Related Articles
- How to Build a Wall with Concrete Blocks: A DIY Guide
- Concrete Retaining Wall Installation Cost Guide
- 12 Smart Cinder Block Retaining Wall Ideas
- Retaining Wall Installation 101: The Ultimate Guide
Frequently Asked Questions
Why can’t I just use standard cinder blocks from the hardware store? This is a common question because cinder blocks are often cheaper, but they are absolutely the wrong choice for a retaining wall. Standard cinder blocks are hollow and designed to bear weight from above, not the immense sideways pressure from soil and water. They will crack and fail under that load. True
How high can I build a retaining wall myself? A good rule of thumb is to keep any DIY retaining wall under four feet in height. Once you go taller than that, the pressure behind the wall increases dramatically, and most local codes will require a building permit and a plan from a licensed engineer. This isn’t just about rules; it’s about safety. A tall, improperly built wall can be a serious hazard, so it’s always best to consult with professionals for anything over that four-foot mark.
My yard isn’t perfectly flat. How do I get the first row of blocks level? This is a very common situation. You don’t have to level your entire yard to build the wall. Instead, you’ll create a “stepped” foundation. You’ll start by digging a level trench for the lowest section of the wall. When you need to follow the slope up, you’ll end that section and dig a new, higher level trench that overlaps slightly, creating a step. This allows each section of your foundation to be perfectly level, even as the entire wall follows the natural slope of your property.
Do I really need to install a drainage pipe and use all that gravel? Yes, absolutely. A proper drainage system is the single most important factor in whether your wall will last. Without it, water gets trapped in the soil behind the wall, creating incredible pressure that will push your blocks outward, causing bulging, cracking, and eventual failure. The gravel and perforated pipe create an easy escape route for water, relieving that pressure and protecting your wall from the force that destroys most DIY projects.
What is “setback” and why does my wall need to lean backward slightly? Setback is the slight, intentional backward lean that a retaining wall has as it gets taller. Most modern retaining wall blocks are designed with a lip or pin system that automatically creates this setback for you. This lean is crucial for strength; it uses gravity to help the wall push back against the weight of the soil. This makes the entire structure much more stable and capable of handling the constant pressure behind it.