
How to Lay Down Sod Patches for a Perfect Lawn
Taking on a lawn repair project can feel a bit intimidating, but it doesn’t have to be. Fixing those damaged or bare areas is one of the most rewarding things you can do for your property’s curb appeal. The secret to a quick and successful fix is using mature turf to patch up the trouble spots. This guide breaks down the process of laying down sod patches into simple, actionable steps that anyone can follow. We’ll cover how to prepare the ground, cut the sod for a perfect fit, and care for it afterward to ensure it takes root and thrives, giving you a beautiful, even lawn.
Key Takeaways
- Prepare the ground for success: A healthy lawn starts with what’s underneath. Before laying sod, it’s essential to clear out old grass, mix in quality compost to enrich the soil, and create a smooth, level surface for the new roots to thrive.
- Install sod patches with precision: For a seamless, professional look, choose a grass type that matches your existing lawn, lay the pieces in a staggered brick-like pattern, and press them down firmly to ensure good root-to-soil contact.
- Commit to consistent aftercare: The work isn’t over after installation. A dedicated watering schedule for the first few weeks and keeping foot traffic off the new grass are non-negotiable steps for establishing a strong, healthy lawn.
What Are Sod Patches and Why Use Them?
Think of sod patches as a “lawn bandage.” They are sections of mature, pre-grown grass that come with soil and roots intact, ready to be laid down in your yard. Instead of waiting weeks for grass seed to sprout and fill in, sod provides an immediate solution for repairing your lawn. It’s a fantastic way to handle damaged or unsightly spots because it offers instant gratification, making your lawn look better right away. Whether you’re dealing with a bare patch from heavy foot traffic, damage from pests, or an area where the grass just won’t grow, sod patches can be a game-changer.
Using sod is a key part of a successful sod installation project because it allows you to target problem areas without redoing your entire yard. This approach is efficient and helps you maintain a consistent, healthy look across your property. By laying down a mature piece of turf, you’re giving that section of your lawn a major head start. The new grass is already established, making it more resilient against weeds and erosion from the moment it’s installed. It’s a straightforward solution for achieving that lush, uniform green carpet you’re aiming for. Plus, since the grass is already grown, you can see the quality and type of grass you’re getting upfront, ensuring it will match the rest of your lawn.
Signs Your Lawn Needs a Patch
Not sure if your lawn is a candidate for patching? Take a walk around your yard and look for a few telltale signs. If you spot noticeable brown or yellow areas that don’t green up with watering, it’s a clear signal. The same goes for completely bare spots where the soil is exposed. These can be caused by anything from heavy foot traffic and pet activity to pest damage or lawn diseases. When you see these kinds of damaged or unsightly areas, it’s a good time to consider patching with new sod. Essentially, any part of your lawn that disrupts its uniform, healthy appearance is a perfect spot for a sod patch.
Sod Patches vs. Seeding: Which Is Better?
When you have a bare spot to fix, you generally have two choices: sod or seed. The biggest difference comes down to speed. Sod gives you an instant lawn, while seeding requires a lot more patience. You can lay a sod patch and have a green, finished-looking area on the same day. With seeds, you’ll be waiting weeks for germination and even longer for the grass to become dense and mature. In fact, new sod blends into the surrounding lawn much faster, whereas grass from seed can take over a year to fully integrate and match the rest of your yard.
While seeding can be a good option for very large areas, sod patches are ideal for quick, targeted repairs. They provide a durable, mature turf from the moment they are installed, which means they are better at crowding out weeds and are ready for light traffic much sooner. It’s a practical choice when you want beautiful results without the long wait.
How to Prep Your Lawn for New Sod
A beautiful lawn starts with what’s underneath. Before you even think about laying down new sod, taking the time to properly prepare the ground is the single most important thing you can do. Good prep work gives the new grassroots a healthy, welcoming place to settle in, which means they’ll establish faster and grow stronger. Skipping these steps can lead to patchy, unhealthy turf down the road. Think of it as creating the perfect foundation for that lush, green carpet you’re dreaming of. If the job feels a bit overwhelming, our professional sod installation team is always here to help.
Clear Out Damaged Grass
First things first, you need to say goodbye to the old, damaged grass. For small patches, you can use a sharp shovel to cut a border around the area you want to replace. Once you have your outline, slide the shovel underneath the old turf to lift it out, weeds and all. Your goal is to create a clean slate of bare soil. If you’re dealing with a larger area of your yard, this manual approach can be pretty labor-intensive. For bigger projects that require more muscle, professional land clearing can get the job done efficiently, ensuring the entire area is perfectly prepped for new life.
Test and Amend Your Soil
With the old grass gone, it’s time to focus on the soil. Healthy soil is the key to a thriving lawn. It’s a great idea to test your soil’s pH and nutrient levels, but at a minimum, you should enrich it with organic matter. Mix a few inches of quality compost into the top six to eight inches of your existing soil. This improves drainage, aeration, and provides essential nutrients for the new roots. Adding a starter fertilizer into the top few inches of soil before you lay the sod will also give your new grass a fantastic head start. This step ensures your sod has everything it needs to grow deep, strong roots.
Level the Ground for a Smooth Finish
Now that your soil is amended, you’ll want to create a smooth, level surface. Use a garden rake to break up any large clumps of dirt and remove any rocks, roots, or other debris. The goal is to have a surface that is flat and even, which will prevent lumpy spots in your new lawn. The soil should be loose and workable, not compacted and hard. This allows the new sod roots to easily penetrate the ground. For yards with significant bumps or slopes, you might need more than a rake. Proper grading through excavation services can create the ideal, level foundation for a flawless lawn.
Gather Your Tools and Materials
Being prepared makes any project go more smoothly. Before you start laying sod, make sure you have all your tools and materials ready to go. You’ll want to have a tape measure, a sharp utility knife for cutting the sod pieces, a shovel, and a rake. It’s also helpful to have a lawn roller to press the sod down firmly and ensure good contact with the soil below. Of course, you’ll also need your new sod, compost or other soil amendments, and a garden hose or sprinkler for that all-important first watering. Having everything within arm’s reach will make the installation process much quicker and easier.
How to Lay Sod Patches Like a Pro
Choose the Right Sod for Your Yard
Picking the right grass is your first step. Not all sod is created equal, and what works up north won’t thrive in the Florida sun. For our climate, you’ll want warm-season types of sod like St. Augustine, Zoysia, or Bermuda, which are built for heat and humidity. Think about the specific spot, too. Does it get full sun or mostly shade? Will it see a lot of foot traffic? Answering these questions helps you select a sod that will flourish. If you’re unsure, professional sod installation can save you a lot of guesswork.
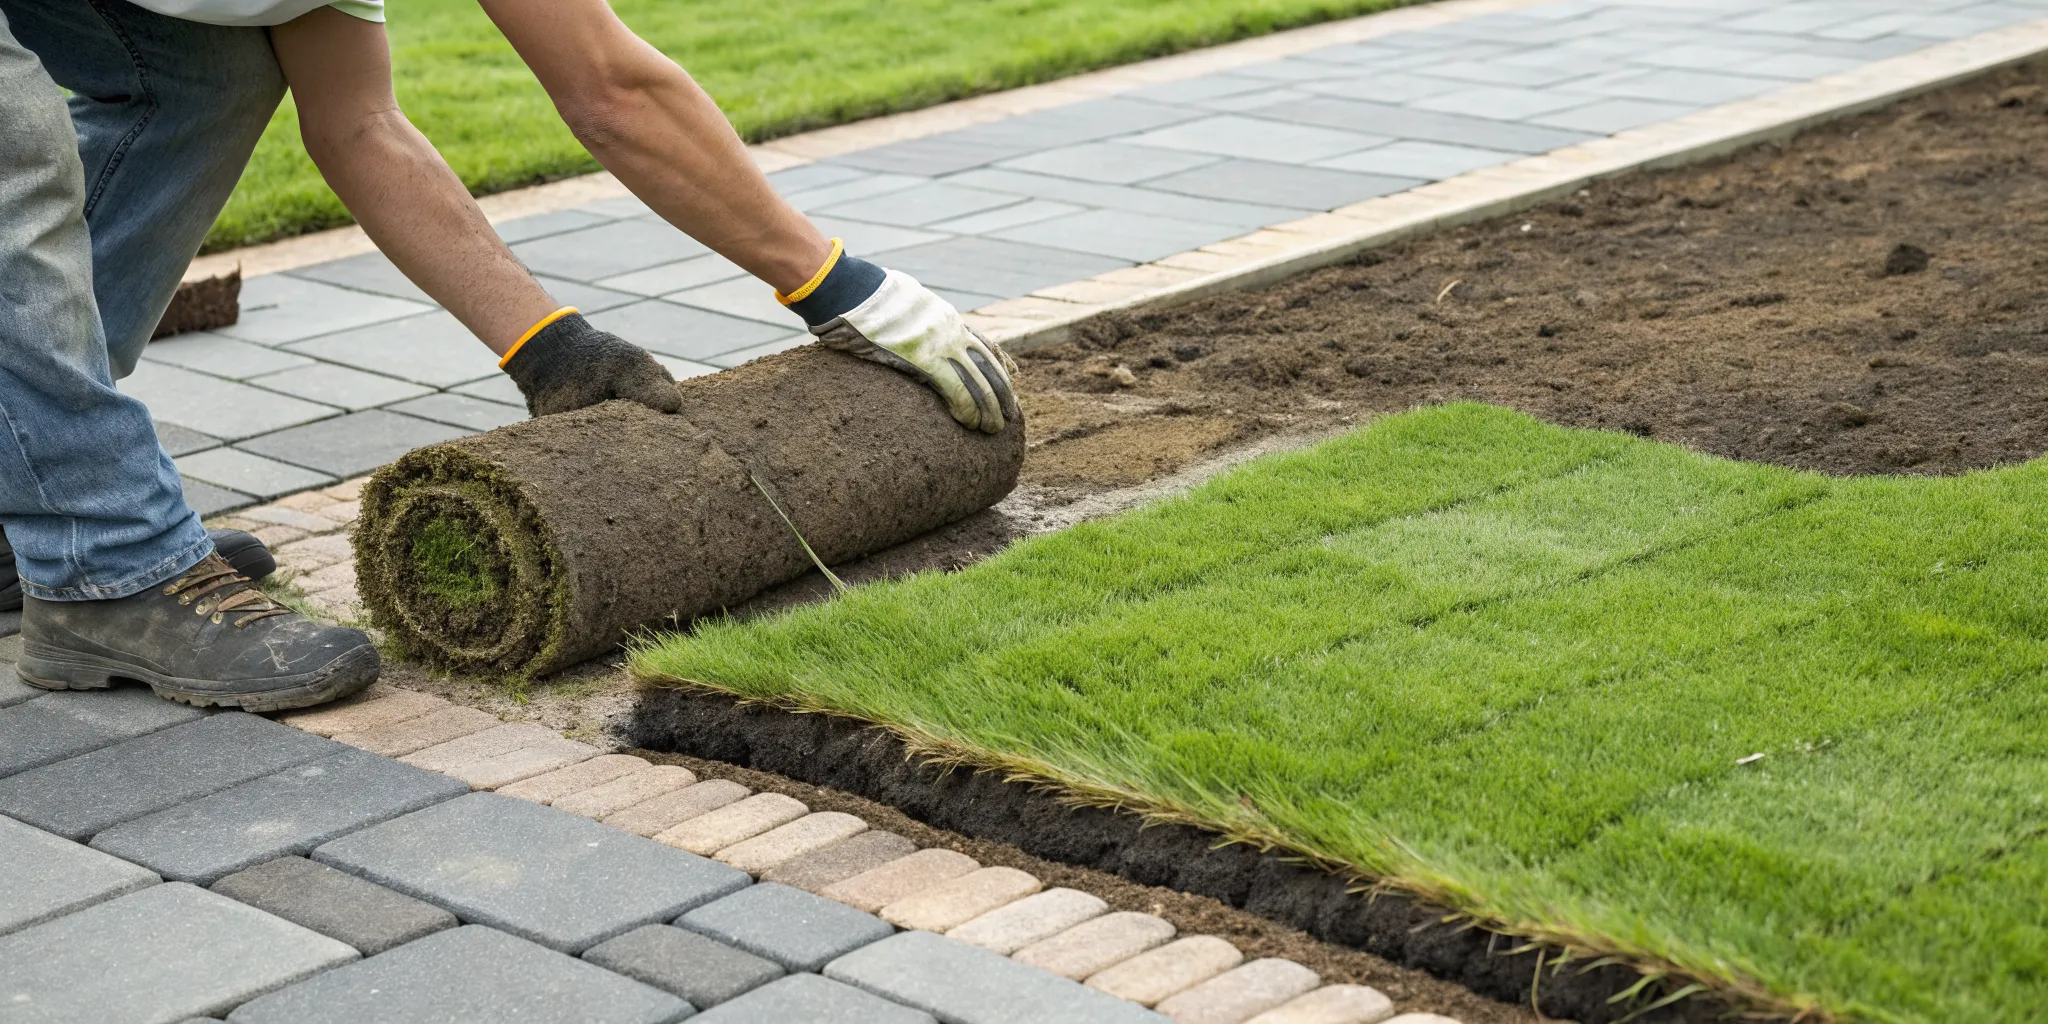
Measure and Cut Your Sod to Fit
Precision is key when patching. Measure the bare area carefully so the new sod fits snugly against the existing grass. Unroll your new sod and mark your cutting lines on the soil side. Using a sharp utility knife, cut the sod from the soil side up toward the grass. This technique gives you a much cleaner edge than trying to saw through the thick blades from the top. Take your time to get the shape just right. A clean, precise cut helps the new patch knit together with the surrounding lawn.
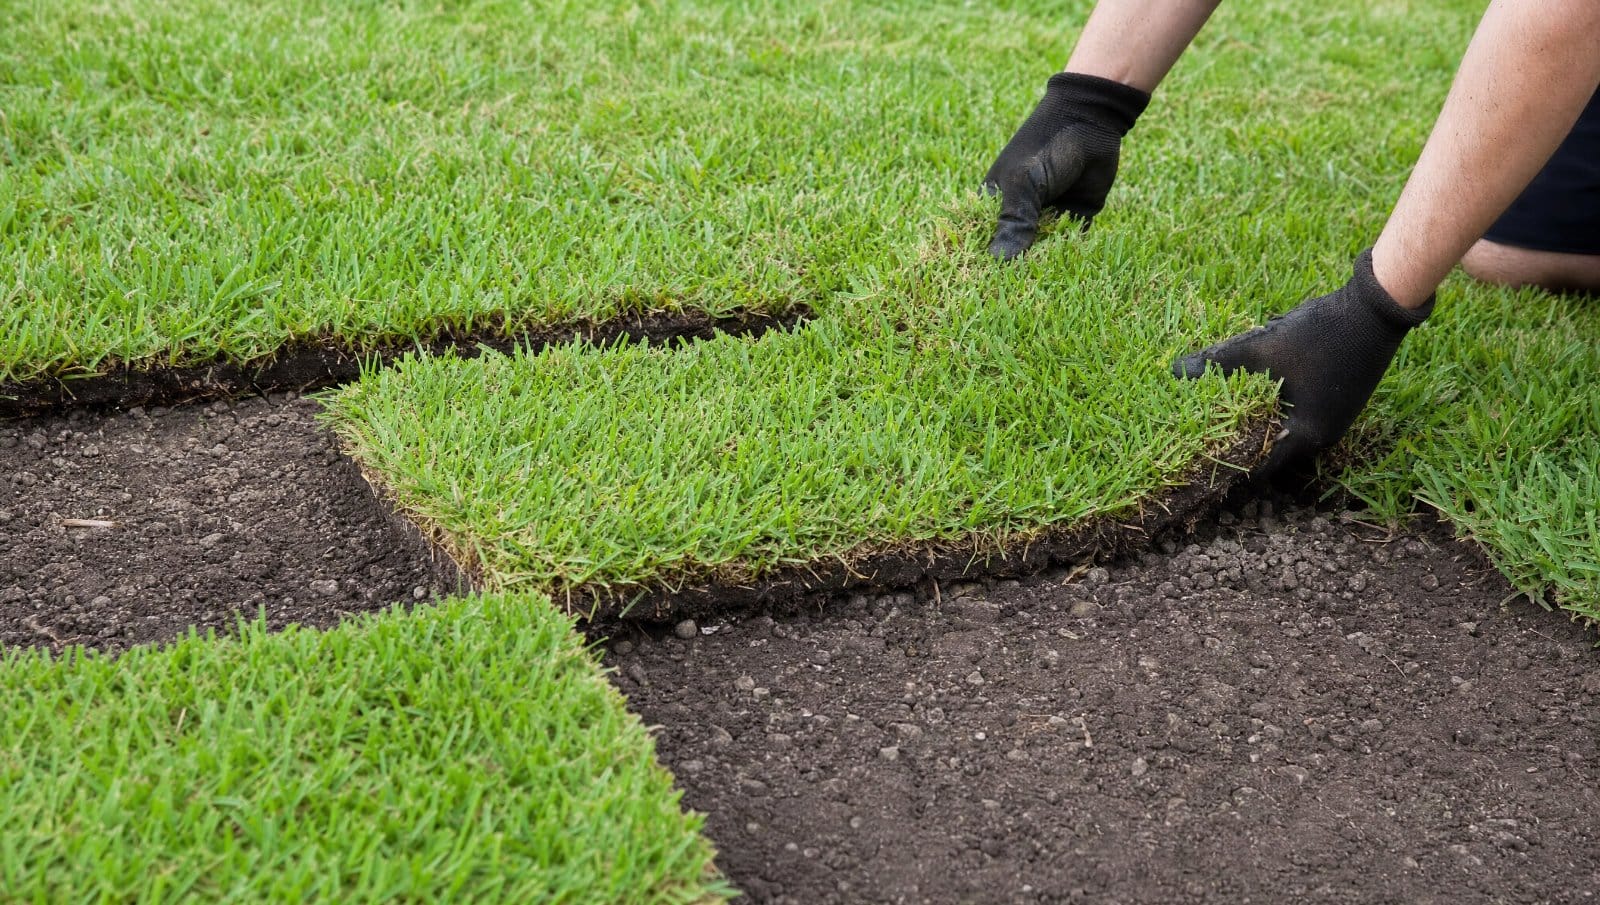
Lay the Sod in the Right Pattern
How you place the sod matters. If you’re patching a larger area with multiple pieces, avoid lining up the seams. Instead, lay the sod in a staggered, brick-like pattern. This simple trick helps the joints disappear much faster as the grass grows in, preventing obvious grid lines in your lawn. Make sure the edges of each piece are pushed up tightly against one another, but don’t let them overlap. The goal is to create tight, gap-free seams that encourage the roots to grow together and establish a strong, unified turf.
Press Firmly to Remove Air Pockets
Your final installation step is crucial for helping the new roots take hold. After placing the sod, you need to ensure its roots are in direct contact with the soil. Air pockets can prevent the roots from getting water and nutrients, causing the patch to dry out. For a small patch, you can walk on it or press it down firmly with your hands. For larger areas, using a lawn roller is a great idea. This gentle pressure eliminates air gaps and gives your new sod the best possible start for healthy growth.
Caring for Your New Sod Patches
You’ve laid your sod patches, and your lawn is already looking better. But the job isn’t quite done. The next few weeks are all about giving that new grass the care it needs to establish strong roots and blend seamlessly with the rest of your yard. Proper aftercare is the final, crucial step to getting that lush, green lawn you’ve been dreaming of. With a little attention, you can ensure your new sod thrives in its new home. Here’s a simple guide to follow.
Your Initial Watering Schedule
As soon as you lay down the last piece of sod, it’s time to give it a good, long drink. Your goal is to water it so thoroughly that the soil underneath is damp about two inches down. This initial soak is the most important one, as it helps the new roots make contact with the soil and start to settle in. Don’t be shy with the hose; you want to ensure every inch is well-hydrated to kickstart its growth. This first watering helps eliminate air pockets and gives your new grass the best possible start.
Long-Term Watering for Strong Roots
For the first week or two, your job is to keep the sod and the soil beneath it consistently moist, but not waterlogged. A good rule of thumb is to check it daily. Once you feel the roots starting to take hold, you can gradually reduce how often you water. This encourages the roots to grow deeper, creating a stronger, more drought-resistant lawn in the long run. It’s a delicate balance, but getting it right sets your lawn up for success. Our professional sod installation team can always provide guidance tailored to your specific lawn.
Keep Off the Grass (For Now!)
This might be the hardest part, but it’s crucial: stay off the new sod for at least the first few weeks. Your new grass is working hard to establish its root system, and any foot traffic can press the sod down, creating air pockets or damaging the delicate new growth. Let your kids and pets know the area is off-limits for a little while. Giving the sod this undisturbed time to settle is one of the best things you can do to ensure it grows in strong and healthy.
How to Know Your Sod Is Taking Root
Curious if your care routine is working? There’s an easy way to check. After about two weeks, gently lift a corner of one of your sod patches. If you feel some resistance, that’s great news! It means the roots are starting to grow down into the soil. If it lifts easily, give it a bit more time and keep up with your watering. By about the one-month mark, the sod should be firmly rooted and feel like a permanent part of your lawn. This simple tug test is a great indicator of a healthy, happy lawn.
How to Blend New Sod with Your Existing Lawn
Getting new sod to look like it’s been part of your lawn forever is the ultimate goal. It’s all about creating a smooth, invisible transition from the old grass to the new. With a few key techniques, you can avoid that obvious “patched-in” look and help your new sod thrive, making your entire lawn look lush and uniform.
Stagger Seams and Trim the Edges
When you lay down your sod patches, think of it like laying bricks. You’ll want to stagger the seams so they don’t create long, straight lines. This simple technique helps the seams close up faster and makes them much less noticeable once the grass is established. After placing a piece, use a sharp utility knife to trim any uneven edges for a clean fit. It’s best to cut from the soil side up toward the grass to avoid tearing the blades. Once everything looks good, firmly pat down the new edges to ensure they make solid contact with the soil, which encourages the roots to start growing right away.
Match Your Grass Types
For a truly seamless look, the new sod must match your existing grass. Mismatched grass types will always stand out, creating a patchy appearance that no amount of care can fix. If you’re not sure what kind of grass you have in your Central Florida lawn, don’t just guess. The best approach is to cut a fresh sample from your yard, including the roots and soil, and take it to a local garden center. Getting professional sod installation can also solve this problem, as an expert can easily identify your grass and ensure you get a perfect match for healthy, uniform growth.
Tips for a Seamless Transition
A smooth transition comes down to one thing: great contact. Make sure the edges of your sod pieces are touching snugly, without overlapping or leaving gaps. Just as important, the roots of the new sod need to be in direct contact with the soil below. After you’ve laid all the patches, go over the area with an empty lawn roller or simply walk on the sod to gently press it down. This action removes air pockets and helps the new sod establish itself much more effectively. It’s a key step for reducing the appearance of seams and encouraging strong, deep root growth from the start.
Common Sod Patch Mistakes to Avoid
Laying sod patches can feel like a straightforward weekend project, but a few common missteps can turn your dream lawn into a frustrating puzzle of brown spots and uneven turf. Getting it right the first time saves you a lot of effort and helps your new grass thrive from day one. The secret to a lush, seamless lawn is understanding what not to do. By avoiding these simple mistakes, you can ensure your new sod takes root successfully and blends beautifully with your existing grass, creating a yard you can be proud of.
Don’t Skip Soil Prep
It’s tempting to just throw a new piece of sod over a bare spot, but skipping soil preparation is a recipe for failure. Good soil prep helps your new lawn grow strong roots and stay healthy. Before you lay anything down, you need to loosen the existing soil with a shovel or tiller. This simple step breaks up compacted earth, allowing the new roots to grow easily. It also helps the soil hold water better, which is crucial for establishing your new patch. A well-prepared foundation gives your sod the best possible start for long-term success.
Avoid Improper Watering
Water is life for new sod, but getting the amount just right can be tricky. You should water new patches at least once or twice a day for the first few weeks until the roots have firmly connected with the soil. The goal is to keep the soil underneath moist, but not a muddy swamp. A great way to check is to gently lift a corner of the sod after watering. The soil should be damp to the touch. Overwatering can lead to root rot, while underwatering will dry out the grass before it can establish itself. Proper landscape drainage can also help prevent water from pooling and damaging the new roots.
Watch Out for Poor Installation
How you place the sod matters just as much as the prep work. Always lay the sod pieces like bricks, staggering the seams. This technique helps the edges knit together faster and makes the final result look much more natural. Make sure the edges of each piece touch snugly without overlapping, and press down firmly to ensure the roots make good contact with the soil below. This eliminates air pockets, which can prevent roots from getting the moisture they need. A professional sod installation ensures every piece is laid perfectly for a seamless finish.
Consider Timing and Weather
Choosing the right time to lay sod can make a huge difference, especially here in Florida. While you can lay sod any time of year, the best seasons are fall and spring. The cooler, milder weather puts less stress on the new grass and helps it establish without drying out too quickly. Trying to lay sod in the peak heat of summer is possible, but it requires far more water and attention to keep it from scorching. Planning your project around the weather gives your lawn a major head start and improves your chances of success.
Need a Hand? Professional Sod Installation in Central Florida
If patching up your lawn or starting from scratch feels like a bigger project than you signed up for, you’re not alone. While DIY can be rewarding, getting that perfect, lush carpet of green requires more than just laying down some turf. For a flawless finish that lasts, bringing in a professional team can make all the difference. Experts in Central Florida’s unique climate know exactly how to prepare the ground, which is the most critical step for a healthy lawn. They handle everything from clearing old grass and amending the soil to ensuring the ground is perfectly level. This meticulous prep work helps your new sod establish strong roots and thrive for years to come.
At Deangelos Land Services, we see a new lawn as part of a bigger picture. Our expertise isn’t just in sod installation; it’s in creating a healthy foundation for your entire outdoor space. We handle the tough groundwork, from initial clearing to final grading, ensuring your property is perfectly prepped for new turf. Our team is committed to transforming your vision into a reality, creating a beautiful lawn that enhances your property. We focus on the details, so you get a seamless, vibrant result without the hassle. Whether you’re renovating a small patch or redesigning your entire yard, our landscaping services are designed to deliver a lawn you can be proud of. When you’re ready for a professional touch, we’re here to help.
Related Articles
- How to Lay Sod in a Small Area: Step-by-Step
- How Long for Sod Lines to Disappear? (+ Tips)
- Sod Installation 101: A Step-by-Step Guide
- How to Lay Sod for Beginners: The Ultimate Guide
Frequently Asked Questions
How soon will my new sod patch blend in with the rest of my lawn? With proper care, you should see the seams of your new sod patch start to disappear within two to three weeks as the grass grows. For the patch to become truly unnoticeable, it needs to establish a strong root system, which typically takes about a month. The key is consistent watering and making sure the new grass type is a perfect match for your existing lawn.
Can I just place a new sod patch over the dead grass? It’s tempting to take a shortcut, but you should never lay new sod directly on top of old or dead grass. The new roots need to make direct contact with nutrient-rich soil to grow. Placing a patch over dead turf creates a barrier that prevents the roots from getting the water and nutrients they need, which will likely cause your new sod to fail.
Is there a “best” time of year to lay sod in Central Florida? While you can technically lay sod year-round here, the ideal times are spring and fall. The milder temperatures during these seasons put less stress on the new grass, helping it establish roots without battling extreme heat. You can certainly install sod in the summer, but you’ll need to be much more diligent with your watering schedule to keep it from drying out.
How do I decide between patching a few spots and replacing my entire lawn? A good rule of thumb is to look at the overall health of your yard. If you have a few isolated bare spots from things like pet activity or a temporary pest issue, patching is an excellent and efficient solution. However, if more than half of your lawn is thin, weedy, or damaged, it’s often more effective to consider a full lawn renovation.
My yard gets soggy after it rains. Will sod patches survive? New sod needs plenty of water, but it can’t survive in standing water. If your yard has areas that stay soggy long after a storm, the excess moisture can lead to root rot and disease, preventing the sod from ever taking hold. It’s best to address any landscape drainage issues before you invest in new turf to ensure your lawn has a healthy foundation to grow on.