
How to Install Pavers Over Dirt: A Pro Guide
Have you ever seen a paver walkway that’s wavy and uneven, with weeds sprouting up through every crack? That’s almost always the result of a failed foundation. Homeowners often ask how to install pavers over dirt because it seems like an easy shortcut, but it’s the primary cause of these exact problems. A stable, well-drained base is the secret to a paver surface that remains flat, secure, and beautiful. Taking the time to properly excavate and build up your foundation layers is the single most important investment you can make in your project, preventing future headaches and ensuring a result you can be proud of.
Key Takeaways
- A Solid Foundation is Non-Negotiable: The stability of your paver project depends entirely on what’s underneath. Proper excavation and a well-compacted base of gravel and sand are essential to prevent the shifting, sinking, and uneven surfaces that occur when pavers are laid on dirt.
- Methodical Prep Work Creates a Professional Finish: Achieving a durable, level surface requires a step-by-step approach. This means clearing and grading the area for drainage, installing edge restraints to lock pavers in place, and compacting your base material before laying the first stone.
- Simple Maintenance Protects Your Hardscape: Your work isn’t finished after the last paver is set. Regular upkeep, such as sweeping, topping off the joint sand as needed, and resealing the surface every few years, is the key to preventing weeds and preserving the look of your new space.
Why Laying Pavers Directly on Dirt Is a Big Mistake
It’s tempting to speed up your project by laying pavers directly on the ground, especially when you’re eager to see your new patio or walkway take shape. But this shortcut almost always leads to disappointment. Placing pavers straight onto dirt is a recipe for a wobbly, uneven surface that simply won’t last. A proper foundation isn’t just a suggestion; it’s the most critical part of any successful hardscaping project.
Without a stable, compacted base, your pavers are guaranteed to shift and settle. Here in Central Florida, our sandy soil and heavy seasonal rains accelerate this process. Water will wash away the dirt from underneath, causing pavers to sink, tilt, and create tripping hazards. A weak base is the main reason paver installations fail. You’ll also be fighting a constant battle with weeds, which will find it easy to sprout up through the gaps between the stones.
A well-built base of gravel and sand does more than just provide a level surface. It creates a solid, interlocking system that distributes weight evenly and is essential for proper landscape drainage. This prevents water from pooling on your patio and protects the entire installation from shifting and damage. Taking the time to prepare the ground correctly ensures your beautiful new space remains stable, safe, and stunning for years to come. It’s the difference between a project you love and one you have to redo.
What You’ll Need for Your Paver Project
Before you even think about laying that first paver, let’s talk about preparation. A successful paver patio, walkway, or driveway is all about what’s underneath. Getting your materials and tools lined up from the start will save you headaches and ensure your project looks great for years to come. Think of it as gathering your ingredients before you start cooking—it just makes the whole process smoother. We’ll walk through the essentials, from the foundation materials to the tools that will give you a professional finish.
The Right Materials for a Lasting Foundation
The secret to a durable paver surface is a solid foundation; placing pavers directly on soil is a recipe for shifting and sinking. You’ll need a few key layers. Start with a quality paver base, which is typically a crushed stone aggregate that provides stability and drainage. On top of that, you’ll add a layer of coarse sand for leveling. Of course, you’ll need the pavers themselves and edge restraints to hold everything in place. Don’t skimp on these materials—the paver base and sand are the most critical parts of the installation. Investing in quality materials is the best way to protect your project and ensure it lasts. For a professional touch, our hardscaping services can help you source and install the perfect materials for your space.
Your Toolkit for a Flawless Finish
Having the right tools on hand makes any job easier, and installing pavers is no exception. You’ll need some basic landscaping tools like a shovel, a wheelbarrow for moving materials, and a sturdy rake for spreading them. For precision, a tape measure, level, and string lines are essential to keep your project square and even. You’ll also want a rubber mallet to gently tap pavers into place and a hand tamp or plate compactor to create a solid, compacted base. A plate compactor is a heavy-duty machine, but you can usually rent one from a local hardware store. Gathering these items before you begin ensures you can work efficiently and achieve a clean, professional look.
Gravel Base vs. Paver Panels: What’s the Difference?
When it comes to your base, you have two main options: a traditional gravel base or modern paver panels. A gravel base involves laying and compacting 4 to 6 inches of crushed aggregate. This method is time-tested, provides excellent drainage, and is the standard for most professional installations, especially for areas that will handle heavy loads like driveways. Paver panels are a newer alternative made from lightweight, high-density polypropylene. They interlock to create a solid base, often requiring less digging and material hauling. While panels can be a great time-saver for smaller DIY projects like a patio or walkway, a traditional gravel base installed with professional excavation services remains the go-to for long-term stability.
How to Prepare Your Base: Excavation and Materials
Getting the base right is the most important part of any paver project. Think of it as the foundation of your house—if it’s not solid, nothing you put on top will last. A properly prepared base prevents pavers from sinking, shifting, or becoming uneven over time. This involves digging to the right depth, choosing the best materials for your situation, and making sure water has a place to go. Taking the time to do this step correctly will save you from headaches and repairs down the road, ensuring your new patio or walkway looks great for years to come.
How Deep to Dig for Your Paver Base
First things first, you need to dig. For a sturdy paver installation that can handle foot traffic and Florida weather, you should excavate the area to a depth of about 7 to 10 inches. This might seem deep, but it’s necessary to make room for the different layers that will support your pavers. This space will hold a layer of gravel base and a layer of sand, which work together to create a stable, level surface. Proper excavation is non-negotiable for a project that stands the test of time, so grab your shovel and get ready to move some dirt.
Why a Traditional Gravel Base Works
The classic method for a paver base uses compacted gravel, and for good reason—it’s incredibly effective. A layer of crushed gravel, about 4 to 6 inches deep, creates a solid foundation that distributes weight evenly and allows for drainage. The key is to add the gravel in 2-inch layers, compacting each one thoroughly before adding the next. A weak or poorly compacted base is the number one reason paver projects fail. This traditional approach ensures your pavers stay put, preventing the shifting and sinking that can ruin an otherwise beautiful installation.
The Benefits of Modern Paver Panels
If the thought of all that digging and compacting sounds like a lot of work, you might want to look into modern paver panels. These interlocking panels are a lightweight alternative to a traditional gravel base. They significantly reduce the amount of excavation needed, which means less digging and less dirt to haul away. Paver panels create a stable, uniform surface and can make the installation process much faster. They are a fantastic option if you’re looking for a more efficient way to achieve a professional-looking result with a little less manual labor.
Plan for Proper Drainage
Water is a paver patio’s worst enemy. If it pools on the surface or gets trapped underneath, it can cause pavers to shift, settle unevenly, or grow mold. That’s why planning for drainage is a critical step. You need to ensure the entire area has a slight slope, directing water away from your home’s foundation or other structures. A good rule of thumb is a drop of about 1 inch for every 8 feet of distance. Getting the grade right ensures rainwater runs off naturally, protecting your investment. If you’re working in an area with known water issues, considering professional drainage solutions can be a project-saver.
The Essential Steps for Prepping Your Ground
With your materials and tools ready, it’s time to prepare the ground. This is the most important phase of your paver installation. A solid, well-prepped base is the secret to a beautiful hardscape that lasts for years without sinking, shifting, or becoming uneven. Rushing through these steps can lead to major headaches later on, so take your time to get it right. Following these four essential steps will create the stable foundation your project needs to succeed.
Step 1: Mark and Clear the Area
First things first, you need a clean slate. Start by marking the exact perimeter of your future patio, walkway, or driveway. You can use stakes and string or marking paint to create a clear outline. Once your area is defined, it’s time to clear everything out. Remove all grass, weeds, large roots, rocks, and any other debris from the space. The goal is to get down to the bare soil. This step is crucial because any organic material left behind will decompose over time, creating empty pockets that cause your pavers to sink and settle unevenly. A thoroughly cleared area is the only way to ensure a smooth, stable surface for the foundation. For larger projects with dense vegetation or stubborn roots, professional land clearing can save you significant time and effort.
Step 2: Excavate and Prepare the Soil
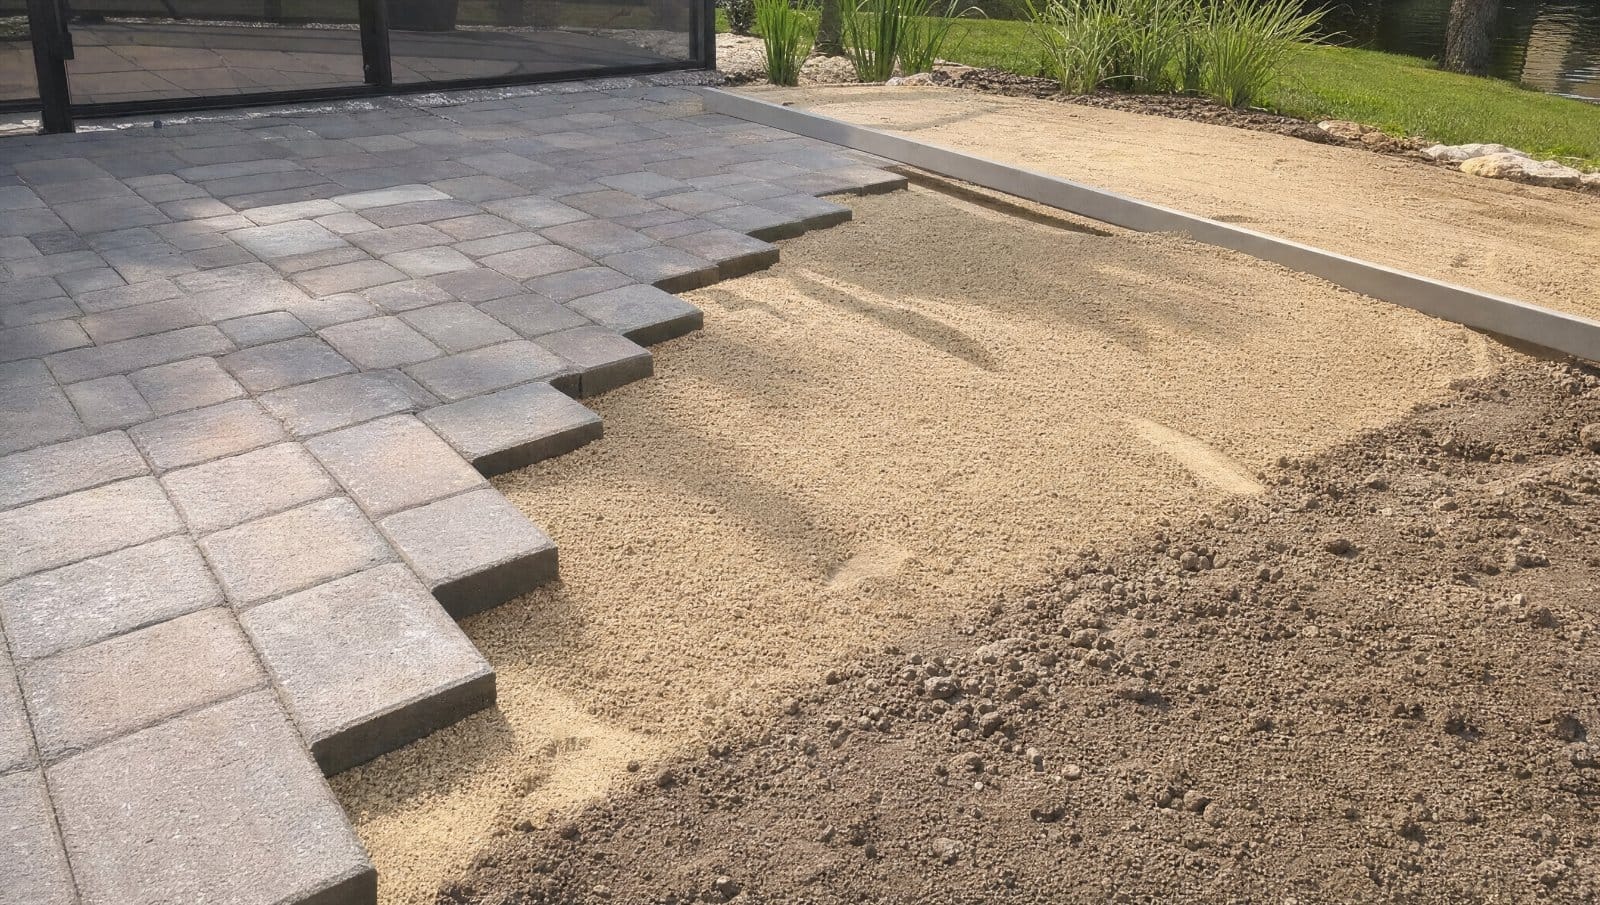
Now it’s time to dig. Proper excavation creates the necessary depth for your base layers, which provide the structural support for the pavers. You’ll need to remove soil to a depth of about seven to ten inches below your final desired paver height. This accounts for the gravel base, the sand layer, and the pavers themselves. As you dig, make sure the ground is graded with a slight slope—about a quarter-inch drop per foot—directing water away from your home’s foundation or other structures. Before you start any serious digging, it’s always a smart move to check for underground utility lines. Our professional excavation services always begin with this critical safety check to prevent any unexpected issues.
Step 3: Install Edge Restraints and Your Base Layer
With the area excavated, you can install your edge restraints. These are typically made of plastic, metal, or concrete and are installed along the perimeter of your project. They act as a permanent border, locking the pavers in place and preventing them from shifting or spreading apart over time. Once the restraints are secured, you can begin adding the base layer. Spread a four- to six-inch layer of crushed gravel or road base evenly across the excavated area. It’s best to add the gravel in two-inch layers, lightly misting each layer with water and compacting it before adding the next. This methodical approach is a key part of quality hardscaping services and ensures a uniformly solid foundation.
Step 4: Compact for a Solid Surface
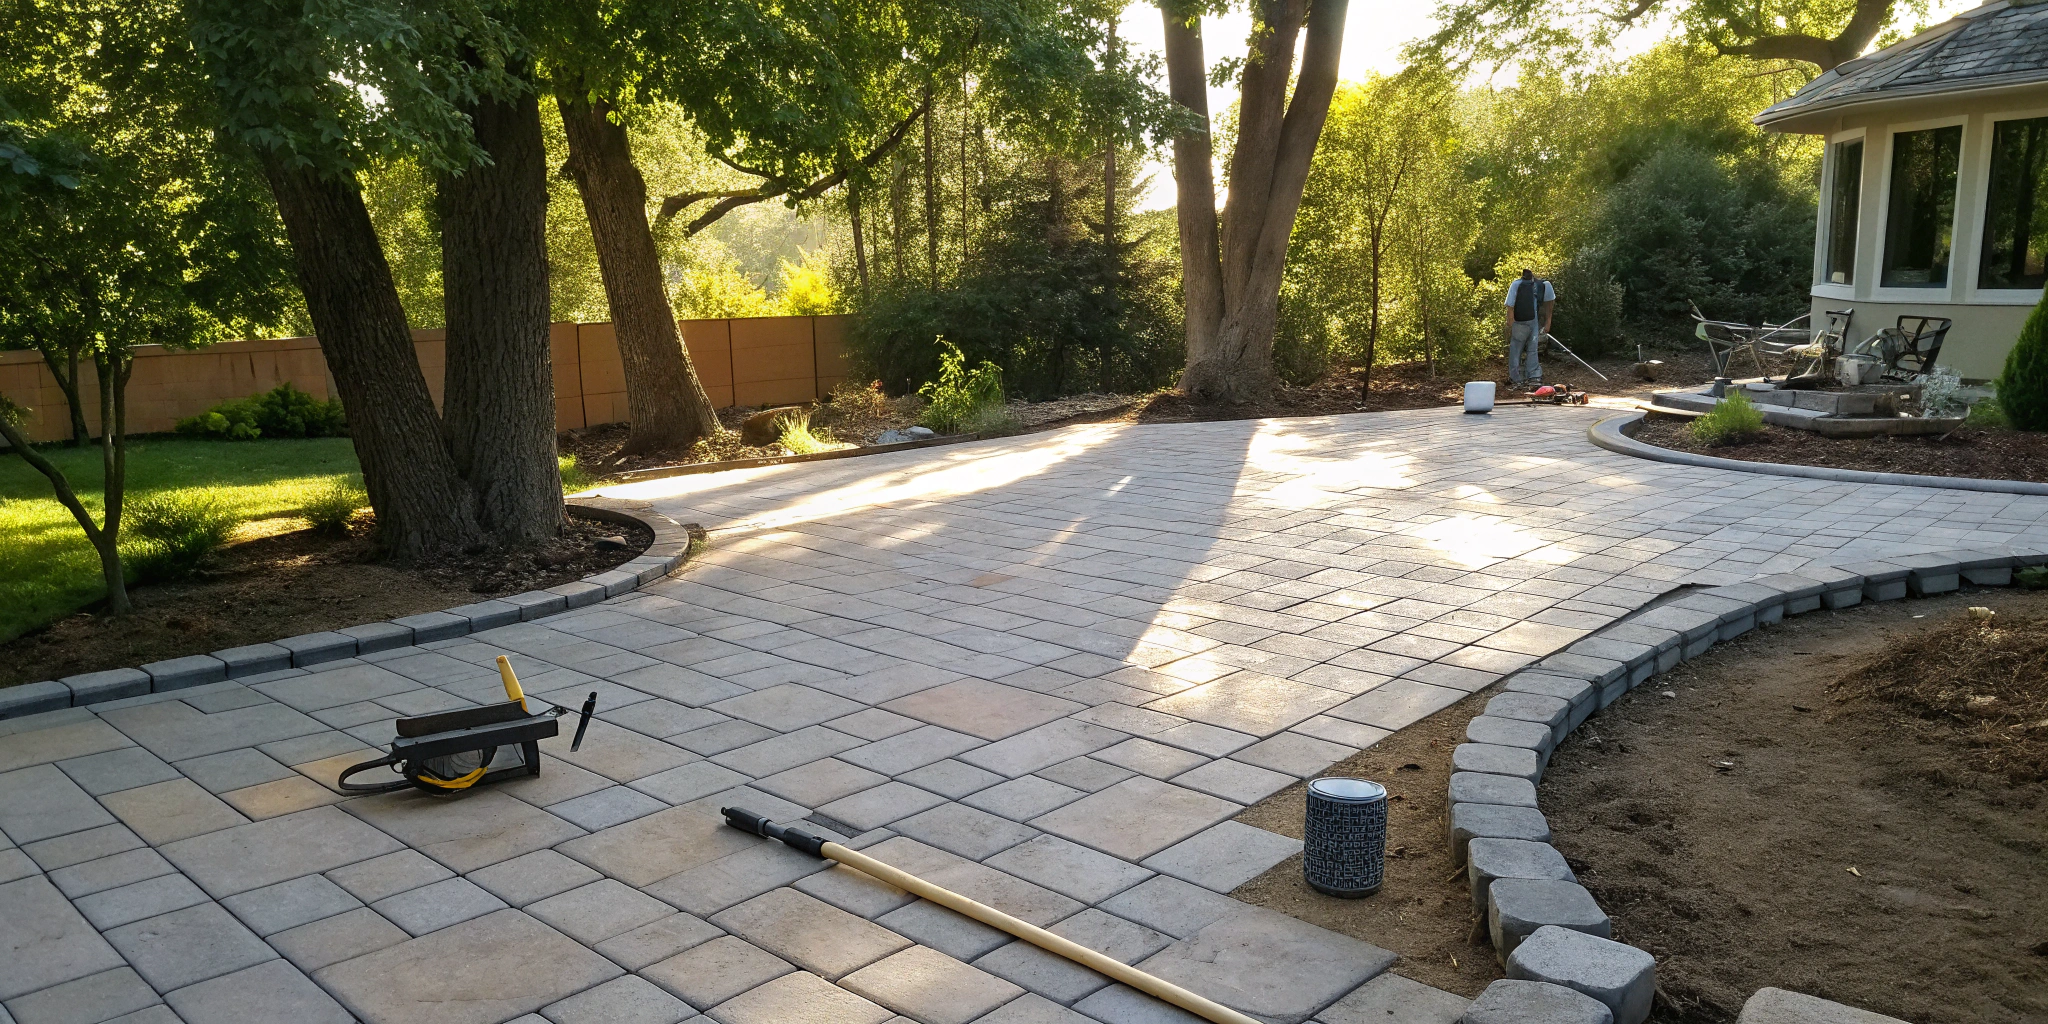
Compaction is the final and most critical step in preparing your base. After spreading your gravel, you need to pack it down tightly to create a dense, stable surface. For small projects, a hand tamper will work, but for larger areas, renting a plate compactor is the best way to go. Run the compactor over the entire gravel base multiple times, moving in different directions to ensure every inch is thoroughly packed. A properly compacted base won’t shift or settle, which is essential for preventing your pavers from sinking or becoming uneven later. Don’t skip this step—a firm, unmoving base is the difference between a DIY project that looks professional and one that needs repairs in a year.
How to Correctly Lay and Secure Pavers
With your base perfectly prepped, it’s time for the most satisfying part of the project: laying the pavers. This is where your vision for a beautiful patio, walkway, or driveway starts to become a reality. Taking your time and focusing on the details here will ensure your new surface not only looks fantastic but also stands up to years of foot traffic and Florida weather. Follow these steps carefully to get a professional-looking finish that you can be proud of.
Step 1: Set Your Guidelines
Before you place a single paver, you need a clear guide. Use stakes and string to outline the perimeter of your project area. This simple step is your roadmap, ensuring your lines stay straight and your final layout is precise. More importantly, you’ll want to use these lines to set a slight slope—about a 2% grade—directing water away from your home’s foundation or other structures. Proper drainage is non-negotiable, especially with our heavy rains, as it prevents water from pooling and undermining your hard work.
Step 2: Lay the Pavers in Your Pattern
Now, you can start laying the pavers. Begin at a corner, preferably one against the house or a hard edge, and work your way out. Place the pavers directly onto your prepared sand or panel base, following your chosen pattern. Whether you’re going for a classic running bond or an intricate herringbone, the key is to place them snugly against each other. Leave a very small, consistent gap for the joint sand later. As you place each paver, give it a gentle tap with a rubber mallet to set it securely. This is the creative part of all hardscaping services, so enjoy bringing your design to life.
Step 3: Keep Everything Level and Evenly Spaced
Consistency is what separates a DIY project from a professional installation. As you lay your pavers, frequently check that they are level with each other. Use your string lines as a guide to keep your rows perfectly straight. If you find a paver is too high or too low, simply lift it and adjust the sand underneath. To maintain uniform gaps between each paver, you can use paver spacers. These small plastic pieces ensure every joint is the same width, which makes a huge difference in the final appearance and structural integrity of the surface.
Step 4: Add Joint Sand and Do a Final Compaction
Once all your pavers are in place, it’s time to lock them in. Spread a layer of polymeric sand over the entire surface. This isn’t just regular sand; it contains polymers that harden when wet, creating a firm, durable joint. Use a push broom to sweep the sand across the pavers, allowing it to fill every gap completely. Next, run a plate compactor over the surface to settle the pavers and lock them into the base. Sweep away any excess sand, then lightly mist the area with a hose to activate the polymers. This final step secures the pavers, prevents shifting, and helps keep weeds from growing through the cracks.
How to Maintain Your New Paver Surface
A new paver surface is a fantastic addition to your property, and with a little care, you can keep it looking its best for years to come. Proper maintenance protects your investment, preventing common issues like weeds, stains, and shifting. Following a simple routine will ensure your patio, walkway, or driveway remains a beautiful and functional part of your landscape.
Simple Cleaning and Upkeep
The easiest way to keep your pavers looking fresh is with regular cleaning. Make it a habit to sweep away leaves, dirt, and other debris. This simple action prevents stains from setting in and stops weeds from finding a place to sprout between the stones. For a deeper clean, you can hose down the surface with water. If you notice any moss or algae, a stiff-bristled brush can help scrub it away. Consistent upkeep is the key to preserving the color and texture of your pavers, ensuring your hardscaping remains a standout feature of your home.
When to Reseal and Replace Joint Sand
After your pavers are installed, applying a quality sealant is a great first step. This protective layer helps shield them from weather, spills, and UV rays that can fade their color over time. This isn’t a one-time task; you’ll want to reseal them every few years, depending on how much foot traffic and sun exposure they get. Also, keep an eye on the joint sand between the pavers. Rain and cleaning can wash some of it away. Topping it off as needed is important because this sand helps lock the pavers in place and prevents them from shifting.
Common Installation Mistakes to Avoid
Proper maintenance starts with a solid installation. The most common reason paver projects fail is a weak or improperly prepared base. Laying pavers directly on dirt will almost always lead to problems like sinking, shifting, and an uneven surface that can be a tripping hazard. A well-compacted base of gravel and sand is what gives your pavers their stability and longevity. Taking the time to build this foundation correctly is the single most important step. It ensures your beautiful new surface can withstand the elements and everyday use without becoming a future headache.
Related Articles
Frequently Asked Questions
Do I really need a gravel base, or can I just use sand? Think of it this way: the gravel base is the foundation, and the sand is the mattress. The gravel provides the heavy-duty structural support that prevents the entire project from sinking and shifting over time. The thin layer of sand on top is just for leveling, allowing you to make tiny adjustments so each paver sits perfectly. Using only sand is a shortcut that will lead to a wavy, unstable surface, especially with our Central Florida rains.
What is polymeric sand, and is it worth using? Polymeric sand is absolutely worth it and is a non-negotiable for a professional finish. It’s a special blend of sand with polymers that harden after being activated with water. This process essentially glues the paver joints together, creating a solid, interlocked surface. This is your best defense against weeds sprouting up and prevents ants from building mounds between your stones. It also keeps the sand from washing out during a heavy downpour.
How do I handle a sloped area for my paver project? A slight slope is actually your friend because it provides natural drainage. The key is to ensure the base itself is perfectly compacted and level, even if the final surface follows the gentle grade of your yard. For a more significant slope, you may need to create a terraced or stepped design. This often involves building a small retaining wall at the lower end to hold back the soil and create a solid, level area for the pavers.
Can I fix a single paver that has sunk or shifted over time? Yes, and that’s one of the best things about pavers compared to a solid concrete slab. To fix a sunken paver, you can use two flathead screwdrivers to carefully pry it out. Then, simply add a bit more leveling sand underneath to bring it up to the correct height, put the paver back in place, and tap it with a rubber mallet. Once it’s level, just sweep new polymeric sand into the joints.
How often should I clean and reseal my pavers to keep them looking new? For general upkeep, sweeping your pavers regularly to remove leaves and dirt will prevent most stains. A good rinse with a garden hose a few times a year can wash away grime. As for sealing, applying a quality sealant after installation is a great idea to protect against stains and fading. You’ll want to reapply it every three to five years, depending on how much sun and foot traffic the area gets.