
How to Remove a Dead Tree: A Homeowner’s Guide
Deciding to take down a dead tree yourself can be a tough call. While the DIY spirit is admirable, tree removal is one job where the stakes are incredibly high. One wrong move could lead to significant property damage or serious injury. So, how do you know when to tackle it yourself and when to call in the professionals? This article is designed to help you make that decision with confidence. We’ll break down the key factors to consider, like tree size and location, and provide a step-by-step guide on how to remove a dead tree if it’s a small, manageable project.
Key Takeaways
- Know the signs of a dead tree to prevent hazards: Brittle branches, missing bark, and a dry, brown layer under the surface are clear indicators. Acting quickly on a dead tree protects your property from falling limbs and potential pest infestations.
- Assess the risk before you DIY: Tree removal is more complex than it looks. If a tree is large, unstable, or near any structures like your house or power lines, calling a professional is the safest choice to avoid accidents and property damage.
- A safe removal requires a complete plan: Your preparation should go beyond just the cut. Always check for underground utility lines before you start, and have a strategy ready for removing the stump and clearing all the debris to fully restore your yard.
Is Your Tree Dead? How to Tell
It can be tough to tell if a tree is just dormant for the season or if it’s truly gone. Before you make any decisions about removal, it’s a good idea to play detective and look for a few clear signs. A sick tree can sometimes be saved, but a dead one poses a risk to your property. Knowing what to look for will help you determine your next steps and keep your yard safe.
Key Visual Clues
Start with a simple walk around the tree. Does it have leaves when other similar trees do? A lack of leaves during the growing season is a major red flag. Check the branches; if they are brittle and snap off easily without any flex, the tree is likely dead. You should also inspect the trunk. Look for deep cracks, large areas of missing bark, or fungus growing near the base. While one or two of these signs might just indicate stress, seeing several together often points to a bigger problem. A certified arborist can give you a professional opinion if you’re unsure.
Simple Vitality Tests
If the visual clues are inconclusive, you can perform a couple of simple tests. Try the scratch test: use a pocketknife or your fingernail to gently scrape away a tiny bit of bark on a young twig. A living tree will have a moist, green layer underneath. If you find a brown, dry layer instead, that part of the tree is dead. You can try this test on a few different branches to see if the entire tree is affected. Also, look for buds. Healthy trees will have pliable, living buds, even in the off-season. If the buds are shriveled and brittle, the tree may not survive.
When to Act Fast
If you’ve determined your tree is dead, it’s important to act quickly. A dead tree is weak and unstable, making it a serious hazard. Its branches can fall without warning, and the entire tree could come down in a storm, potentially damaging your home, car, or power lines. The longer a dead tree stands, the more brittle its wood becomes, which can make the removal process more complex. For trees that pose an immediate threat, especially after a storm, you may need an emergency tree removal to safely resolve the situation and protect your property.
The Dangers of a Dead Tree
That dead tree in your yard might seem harmless, but it’s more than just an eyesore. It’s a ticking clock. As a tree dies, its structural integrity weakens, turning it into a significant liability. The wood becomes brittle, the root system fails, and it loses its ability to withstand the elements, especially Florida’s high winds and heavy rains. Ignoring a dead tree can lead to serious problems for your property, your family, and even your neighbors. Understanding these risks is the first step toward protecting your home. A dead tree can fall without warning, bringing down heavy branches or the entire trunk. Beyond the immediate physical threats, it can also attract unwanted pests and create a fire hazard.
Risks to Your Property
A dead tree is a direct threat to everything on your property. Its heavy branches can break off in the wind, or even on a calm day, and come crashing down on your roof, car, fence, or shed. In a worst-case scenario, the entire trunk could topple over, causing catastrophic damage to your home. While Florida storms certainly increase the danger, a decaying root system can fail at any time. Removing large trees safely is a complex job that requires careful planning and specialized equipment to avoid property damage during the process. A professional tree removal service has the expertise to assess the tree’s condition and determine the safest way to bring it down without harming your home or landscaping.
Hazards for People and Pets
The most serious danger posed by a dead tree is the risk of injury. Falling limbs or a collapsing trunk can be incredibly dangerous for anyone underneath, including family members, guests, and pets playing in the yard. Because dead trees are so unpredictable, it’s impossible to know when a branch might give way. This creates a constant hazard in your own yard, turning a space meant for relaxation and play into a potential danger zone. If the tree is located near a sidewalk or a neighbor’s property, you could also be responsible for any harm it causes. Promptly addressing a dead tree is the best way to ensure your outdoor space remains a safe and enjoyable place for everyone.
Fire and Pest Problems
Dead trees are highly flammable and act as potent fuel for wildfires. In dry conditions, a dead tree can ignite quickly and help a fire spread rapidly across your property and toward your home. Beyond the fire risk, decaying wood is an open invitation for pests. Termites, carpenter ants, and other wood-boring insects are drawn to the easy meal a dead tree provides. Once they’ve established a colony, it’s a short journey for them to find their way into your house. Even after a tree is cut down, leaving the stump behind can attract these same pests and create a tripping hazard. Complete removal is key to maintaining a safe, healthy, and pest-free yard for the long term.
DIY vs. Pro: When to Call for Help
Tackling a home project yourself can be incredibly satisfying, but tree removal is one area where you need to be honest about the risks. While it might seem straightforward, removing a dead tree, especially a large one, is a job that often requires professional skill and equipment. The decision to DIY or call for help really comes down to a few critical factors. Before you pick up a saw, let’s walk through what to consider to ensure the job gets done safely and correctly.
Considering Tree Size and Complexity
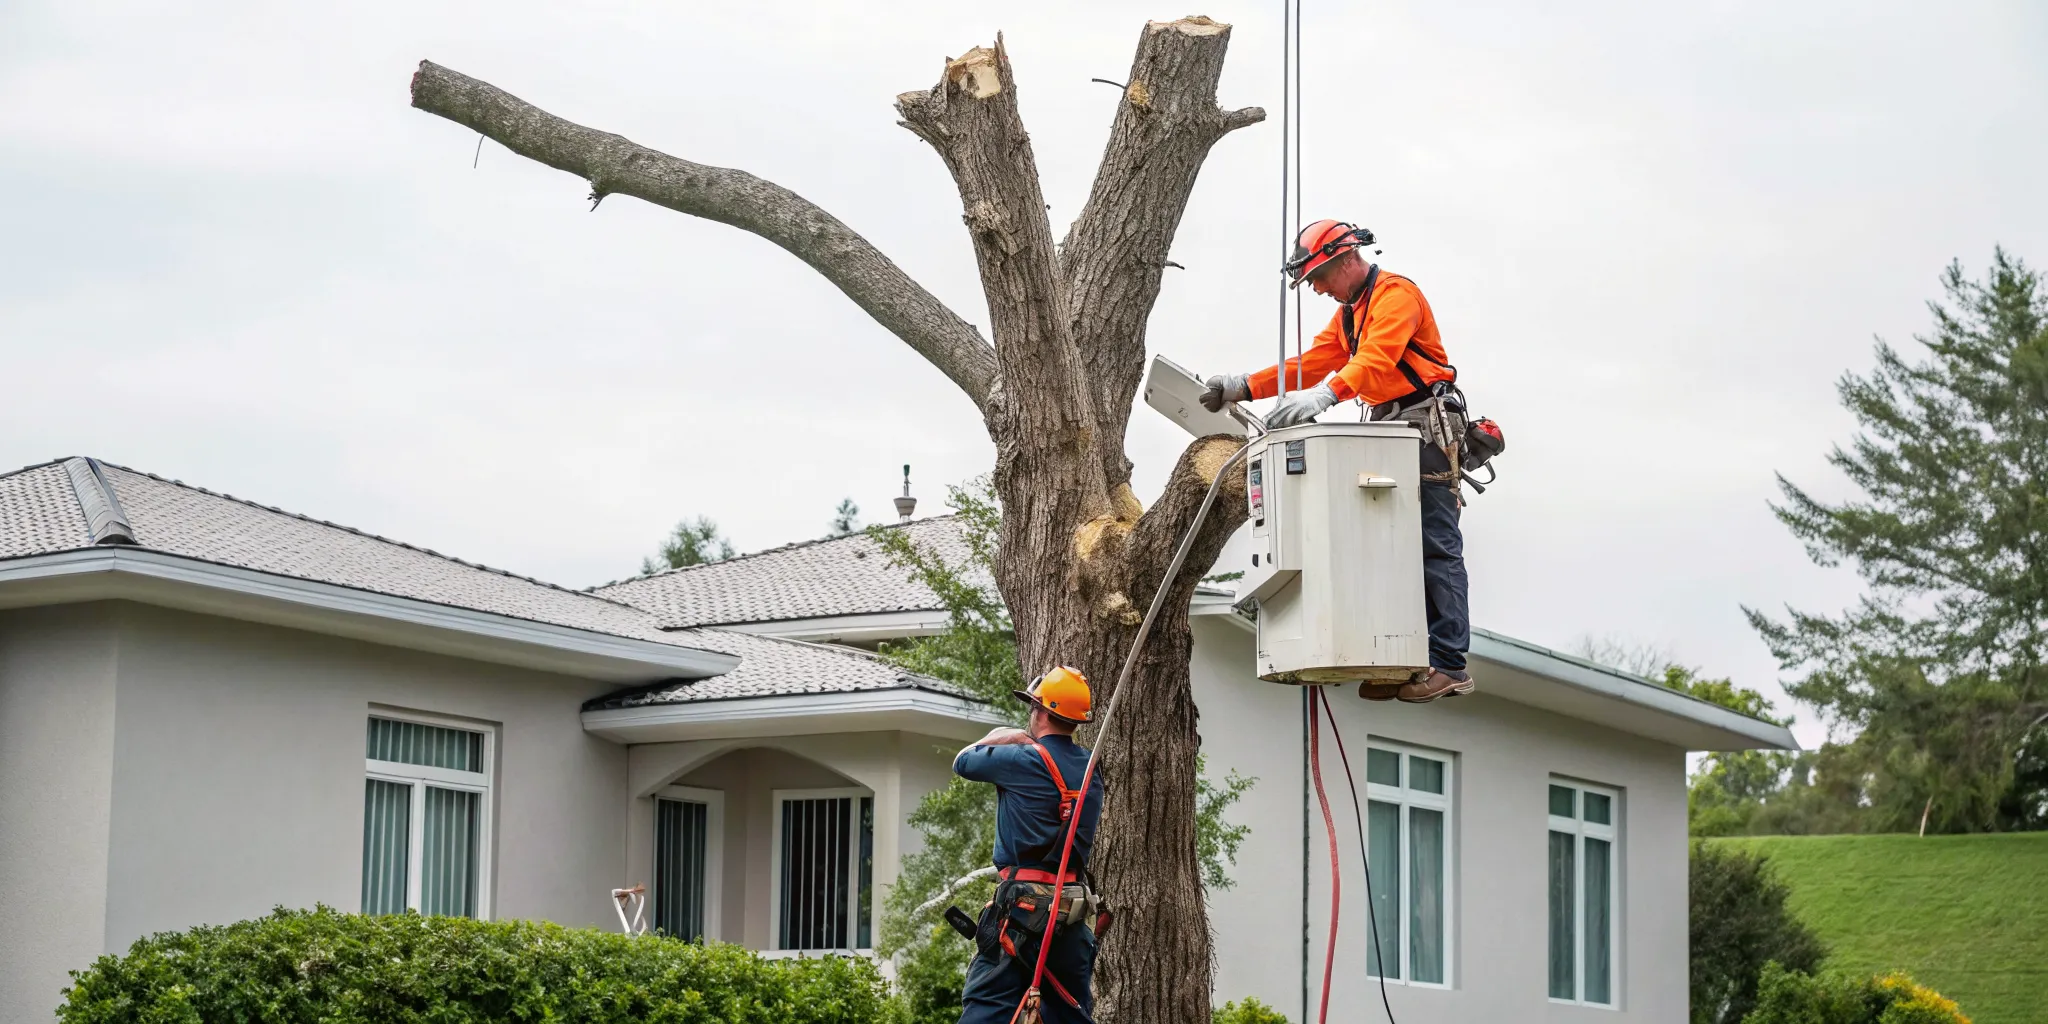
The most important factor in your decision is the tree’s size. If you’re dealing with a small, young tree with a trunk only a few inches in diameter, you can likely handle it yourself. However, large trees are a different challenge entirely. Safely removing them without causing property damage requires careful planning, the right equipment, and a solid understanding of tree dynamics. A tall, heavy tree can fall in an unexpected direction, and its weight alone can cause significant damage. A professional tree removal service has the experience to predict the fall, rig the tree properly, and bring it down in a controlled way.
Checking for Nearby Hazards
Take a good look at the area around the tree. Is it close to your house, a fence, a shed, or your neighbor’s property? Power lines are one of the most dangerous hazards in tree removal, and they are often underestimated. If any part of the tree could potentially fall on a structure or a power line, the risk of going it alone is just too high. A professional crew is trained to assess these situations and use specific techniques to dismantle a tree piece by piece, avoiding any damage to your property. This careful approach prevents accidents and the need for extensive storm damage cleanup after the fact.
Understanding Local Rules
Before you start cutting, you need to know the local regulations. Many cities and counties in Central Florida, including Lake Mary, have ordinances about tree removal. You may need a permit, especially if the tree is a protected species or over a certain size. Figuring out these rules can be confusing, and removing a tree without the proper permissions can lead to fines. Local professionals are familiar with these requirements. Consulting with certified arborist services can save you a major headache, as they understand the permit process and can ensure your project complies with all local laws.
Gearing Up: Your DIY Tree Removal Toolkit
Before you make a single cut, it’s critical to gather the right equipment. Tackling a tree removal project without the proper tools is not only inefficient, it’s incredibly dangerous. Having the correct gear on hand ensures you can work safely and effectively. This means getting your personal protective equipment ready, selecting the right cutting tools, and understanding how to match your toolkit to the specific tree you’re removing. Preparation is everything, and it begins with a well-equipped workspace.
Essential Safety Gear
Let’s be clear: your safety is the top priority. Never attempt to cut down a tree without wearing the proper Personal Protective Equipment (PPE). This isn’t a step you can afford to skip. Your essential safety kit should include a hard hat to protect you from falling branches, safety goggles to shield your eyes from wood chips, and heavy-duty gloves to prevent cuts. Finally, a pair of steel-toed boots will protect your feet from falling limbs or heavy equipment. Each piece of gear plays a vital role in preventing serious injury, which is why professionals never work without them during an emergency tree removal.
The Right Cutting Tools
The tools you need will depend on the tree, but a few staples belong in any DIY removal toolkit. For smaller branches, a sharp handsaw or a pair of loppers will do the trick. The primary tool for felling the tree itself is a chainsaw. If you plan to use one, be sure you are completely comfortable with its operation and safety features, as it is a powerful piece of equipment. An axe can also be useful for making initial cuts or driving wedges to guide the tree’s fall. Thinking ahead to cleanup, a wood chipper can help you manage the branches and debris once the tree is down.
Matching Tools to the Tree
Choosing the right equipment starts with a careful inspection of the tree. A small, young tree might only require a handsaw, while a larger one will certainly call for a chainsaw. Before you begin, assess the tree’s diameter, height, and overall condition. For bigger or more complicated jobs, you might need advanced equipment like rigging gear, ropes, and pulleys to safely lower large sections. This type of specialized gear is standard for professional arborist services, as it allows them to dismantle a tree piece by piece. Using a tool that’s too small for the job won’t work, and using one that’s too powerful for your experience level can lead to disaster.
Safety First: Pre-Removal Checklist
Before you even think about picking up a saw, taking a few critical safety steps can prevent major accidents and property damage. A dead tree is unpredictable, and a successful removal is all about careful planning. This checklist covers the essential groundwork you need to lay before making the first cut. Rushing this stage is a common mistake that can lead to serious problems, so take your time and be thorough. A safe removal starts long before the tree begins to fall.
Check for Underground Lines
The first thing you should always do is identify what’s happening below the surface. Your yard is likely home to a network of underground utility lines for water, gas, electricity, and communications. Accidentally hitting one of these lines can create a dangerous situation and lead to significant service disruptions. Before you dig or start any work that could disturb the ground, call 811. This free service will send someone to mark the location of any buried lines, so you know exactly which areas to avoid. It’s a simple, non-negotiable step for any homeowner.
Assess Your Surroundings
Take a good, long look at the area around the tree. Note the proximity of your house, garage, fence, and any neighboring properties. Pay special attention to overhead power lines, as they are one of the most serious hazards in tree removal. A dead tree can drop heavy branches unexpectedly or fall in an unplanned direction, causing severe damage. If the tree is close to any structures or power lines, it’s often best to consult with a professional arborist service to get an expert opinion on the safest approach.
Plan the Fall and Your Escape
Once you’ve cleared the area of any obstacles, you need to decide where you want the tree to land. Identify a clear “fall zone” that is free of structures, landscaping, and other trees. Mark this direction clearly. Just as important is planning your escape route. You should have at least two clear paths to retreat in the opposite direction of the fall. Also, take a moment to check with your local city or county office about permit requirements. Some areas have regulations about tree removal, and confirming this beforehand can help you avoid any potential issues.
A Step-by-Step Guide to Removing a Small Tree
If you’ve decided to handle a small, dead tree on your own, having a clear plan is essential. This process is manageable, but only if the tree is genuinely small (think a trunk diameter you can easily wrap your hands around) and located far from any structures or power lines. For anything larger or more complicated, your safest bet is always to call in a professional. But for a straightforward removal, following these steps will help you get the job done safely and effectively. Remember to wear your safety gear, including gloves and eye protection, from start to finish.
Prepare the Area
First things first, take a good look at the tree and its surroundings. Before you even think about making a cut, you need to inspect the tree carefully for any signs of instability or tricky branches. Decide which way you want the tree to fall, choosing a clear, open path. Mark this direction on the ground. Next, clear the area completely. Move any patio furniture, garden tools, toys, or decorations out of the fall zone. You’ll also want to clear a path for yourself so you can get away quickly once the tree starts to go. Having all your tools ready and within reach will make the process much smoother.
Make the Right Cuts
For very small saplings, you might be able to simply dig them out with a shovel or use a pickaxe to work through tougher roots. If the tree is a bit more established, you’ll need to make some cuts. A good strategy is to cut the trunk about 6 to 12 inches above the ground. This leaves you with a small stump that you can use as a handle to grab and push against when you start working on the roots. This leverage is incredibly helpful for wrestling the root ball out of the ground. If you find the cutting process more difficult than expected, it might be a sign that a professional tree removal service is the better option.
Loosen the Roots
With the main part of the tree gone, your focus shifts to the root ball. This can be the most labor-intensive part of the job. Start by digging a trench around the stump to expose the main roots. A great trick to make this easier is to flood the trench with water and let it soak in for about an hour. Soaking the soil helps soften it, making the roots easier to pull. You can then use a pickaxe and a spade to chop through the roots and rock the stump back and forth. This motion will gradually loosen its grip until you can pull it free.
Common DIY Mistakes to Avoid
Taking on a tree removal project yourself can feel empowering, but it’s a job where small mistakes have big consequences. Many homeowners find themselves in over their heads, turning a weekend project into a dangerous situation. Understanding these frequent errors is the first step to avoiding them. From underestimating the tree’s behavior to forgetting about the mess left behind, a little foresight goes a long way. If the job feels too big, remember that professional tree removal is always an option.
Skipping Safety and Using Wrong Tools
It’s tempting to jump right in, but ignoring personal protective equipment (PPE) is a serious gamble. At a minimum, you should always wear a helmet, safety glasses, and sturdy gloves. Using the wrong tools is just as risky. A saw that’s too small or dull won’t just make the job harder; it can cause dangerous kickbacks or lead to poor cuts that send the tree in an unexpected direction. Professional teams are trained to handle tricky removals because they have the right equipment and know how to use it safely. Don’t compromise on your well-being.
Misjudging the Tree and Making Bad Cuts
One of the biggest mistakes is thinking tree removal is simple. Every tree is different, and factors like rot, lean, and branch distribution can make it fall in unpredictable ways. Making improper cuts is another common error. There’s a specific science to felling a tree, involving a directional notch and a back cut to guide its fall. Without this knowledge, you could easily lose control, sending tons of wood crashing toward your home or fence. An experienced arborist can assess a tree’s condition and structure to plan the safest approach.
Forgetting About the Cleanup
Getting the tree on the ground is only half the battle. What’s your plan for the mountain of branches and logs? Many DIYers don’t think about the debris until it’s covering their yard, creating new hazards. You’ll need a way to chop it up and haul it away. And don’t forget the stump. Leaving it in the ground can attract termites and other pests, and it creates a stubborn tripping hazard. Proper land clearing involves removing the stump and all debris, leaving you with a clean, usable space.
Tackling the Stump: What’s Next?
Once the tree is down, you’re left with the final piece of the puzzle: the stump. Leaving it can be an eyesore and a tripping hazard, so dealing with it is the last step in reclaiming your yard. Depending on the stump’s size and your willingness to put in some sweat equity, you have a few options for removal. From digging it out by hand to calling in heavy machinery, the right method will get your property looking clean and clear.
Removing It by Hand
If you’re up for a physical challenge and dealing with a smaller stump, removing it manually is a solid option. You’ll need a few sturdy tools like a pickaxe, a spade, and maybe a good axe or saw for the roots. Start by digging around the stump to expose the main root system. As you uncover the roots, you can use your spade and pickaxe to rock the stump back and forth, loosening its grip on the soil. Once you’ve exposed the larger roots, you can cut through them. It’s a slow and steady process, but with persistence, you’ll be able to pull the stump free.
Using Grinders or Treatments
For a much faster and less labor-intensive approach, stump grinding is the way to go. A stump grinder is a powerful machine that essentially chews the stump and its roots into small wood chips, grinding it down below the surface of the ground. This method is highly effective, especially for large, stubborn stumps. However, this is heavy-duty equipment that requires an experienced operator for safe use. For this reason, most homeowners hire a professional tree removal service to handle stump grinding. They have the right tools and expertise to get the job done quickly and safely, leaving you with a level surface ready for new grass or plants.
Exposing and Cutting the Roots
This method is a more strategic way to remove a stump by hand. Instead of just digging and pulling, you’ll focus on systematically severing the roots that anchor the stump in place. Start by digging a trench around the stump’s base to get a clear view of the root structure. You can even push on the stump to see where the ground moves, which helps you locate the biggest roots. Once a large root is exposed, clear the soil from around it with a trowel and cut it with a hand axe or crowbar. Work your way around the stump, cutting each major root until the stump is free enough to be removed from the ground.
The Final Step: Cleanup and Restoration
Getting the tree safely on the ground is a huge accomplishment, but the job isn’t quite finished. The final phase of any tree removal project is the cleanup and restoration of your yard. A thorough cleanup not only makes your property look great again but also ensures it’s safe for your family and pets by removing tripping hazards like stray branches and roots. This is also your chance to prepare the ground for whatever you have planned next, whether it’s a lush patch of grass, a new garden bed, or another beautiful tree.
A professional team handles this entire process from start to finish, leaving your property looking better than when they arrived. They have the right equipment to manage large logs, grind stumps, and clear away every last bit of debris. Proper storm damage cleanup services, for example, focus on efficiently restoring order to your landscape after an event. Taking the time to properly clean up and restore the area turns the removal of a dead tree into an opportunity to improve your outdoor space. It’s about more than just tidiness; it’s about reclaiming your yard and setting the stage for new growth. A complete restoration leaves no trace of the old problem, just a clean, safe, and beautiful area ready for its next chapter.
Disposing of the Wood
Once the tree is down, you’ll be left with a lot of wood. What you do with it depends on the tree’s condition and your own plans. If the wood is healthy, you have several great options. You can cut it into logs for firewood, but remember to let it season properly before burning. The wood can also be repurposed for landscaping projects, like creating natural borders for garden beds or even rustic outdoor furniture.
If the tree was diseased, it’s best to have it removed from your property to prevent the issue from spreading to other plants. For the large trunk and branches, a professional service can haul them away or chip them into mulch for you. This ensures the wood is handled safely and efficiently.
Clearing the Debris
Tree removal creates more than just logs; it leaves behind a mess of leaves, twigs, sawdust, and small branches. It’s smart to have a plan for this debris before you even start cutting. Clearing the area thoroughly is key to making your yard safe and usable again. Rake up all the smaller pieces and gather them for disposal. A clean slate prevents tripping hazards and makes it easier to assess the condition of your lawn and soil.
For a truly pristine finish, a comprehensive cleanup is essential. Professional crews are equipped to handle all the debris, ensuring nothing is left behind. This attention to detail is a standard part of any professional tree removal project.
Prepping the Soil for What’s Next
With the tree and debris gone, you can turn your attention to the ground itself. The area where the tree stood will need some care to recover. Start by filling any holes with good-quality topsoil to level the ground. If your lawn was damaged during the removal, you may need to loosen compacted soil and consider a fresh sod installation to repair the turf.
This is the perfect time to envision the future of this spot. Do you want to grow grass, plant a garden, or introduce a new tree? If you’re thinking about planting again, consulting with an arborist can help you choose a species that will thrive in that specific location, ensuring your landscape remains beautiful for years to come.
Related Articles
- Arborist Report Example: A Complete Breakdown
- Dead Tree Removal: A Homeowner’s Safety Guide
- Why Hire a Certified Arborist for Tree Trimming?
Frequently Asked Questions
What’s the easiest way to tell if my tree is dead or just dormant for the winter? The simplest method is the scratch test. Use your fingernail or a small knife to gently scrape a tiny spot of bark on a few different twigs. If you see a moist, green layer underneath, the tree is alive. If it’s brown and dry, that part of the tree is dead. Also, check the branches; living branches will have some flexibility, while dead ones will be brittle and snap easily.
My tree is dead, but it doesn’t look like it’s going to fall. Can I just leave it? Leaving a dead tree standing is a significant risk. Over time, the wood becomes weaker and more brittle, making it completely unpredictable. It can drop heavy limbs or fall entirely without warning, especially during a storm. A dead tree also attracts pests like termites and carpenter ants, which can eventually find their way to your home. It’s always safer to address it promptly.
When is it okay to remove a tree myself, and when should I absolutely call a professional? You can likely handle a very small tree yourself if its trunk is only a few inches in diameter and it’s located in an open area, far from your house, fences, or power lines. For any tree that is large, leaning, or close to any structure, you should always call a professional. They have the right equipment and expertise to bring it down safely without damaging your property.
Do I really have to remove the stump after the tree is gone? While you can leave a stump, it’s generally not a good idea. Stumps can be stubborn tripping hazards, get in the way of mowing, and attract unwanted pests like termites. Removing the stump, usually by grinding it down, is the best way to fully reclaim your yard. This leaves you with a clean, level space that’s ready for new grass or landscaping.
What can I do with the empty space after a tree is removed? Think of it as a fresh start for your landscape. Once the stump is gone and the ground is leveled with fresh topsoil, your options are wide open. You could lay new sod to create a seamless lawn, plant a beautiful garden bed, or even install a new, healthy tree. If you decide to plant another tree, consulting an arborist can help you choose a species that will flourish in that spot.